Applied Generative AI
Hands-On with n8n: From Basics to Your First AI Agent
A written companion to Session 20 of the Magna Carta College Applied Generative AI Bootcamp. Set up n8n from scratch and build one agent that books calendar meetings, answers questions from your own PDFs with RAG, and generates images, all from a single chat.
Introduction
About this session
This guide accompanies Session 20 of the Applied Generative AI Bootcamp at Magna Carta College. The objective of this session is twofold: (1) set up a working n8n development environment on your own machine, and (2) build your first functional AI workflow — an agent that can chat, remember, and call tools. Sessions later in the bootcamp build on this foundation; everything you wire up here is reused.
What this guide is
A written companion to the live session and the source video tutorial. It expands every chapter into a clear, illustrated walkthrough you can read at your own pace. Each module opens with the concept you're about to learn, shows you the wiring with a diagram, then walks through the exact steps you carry out in n8n. Screenshots from the live build show you exactly what each screen should look like.
Who this guide is for
Anyone who wants to understand AI agents in practice — marketers, founders, developers, analysts, students. No prior n8n experience is assumed. Basic comfort with installing software and using a browser is enough. You do not need to write code; when the tutorial calls for a JavaScript expression, we show you how to ask ChatGPT for one.
What you will build
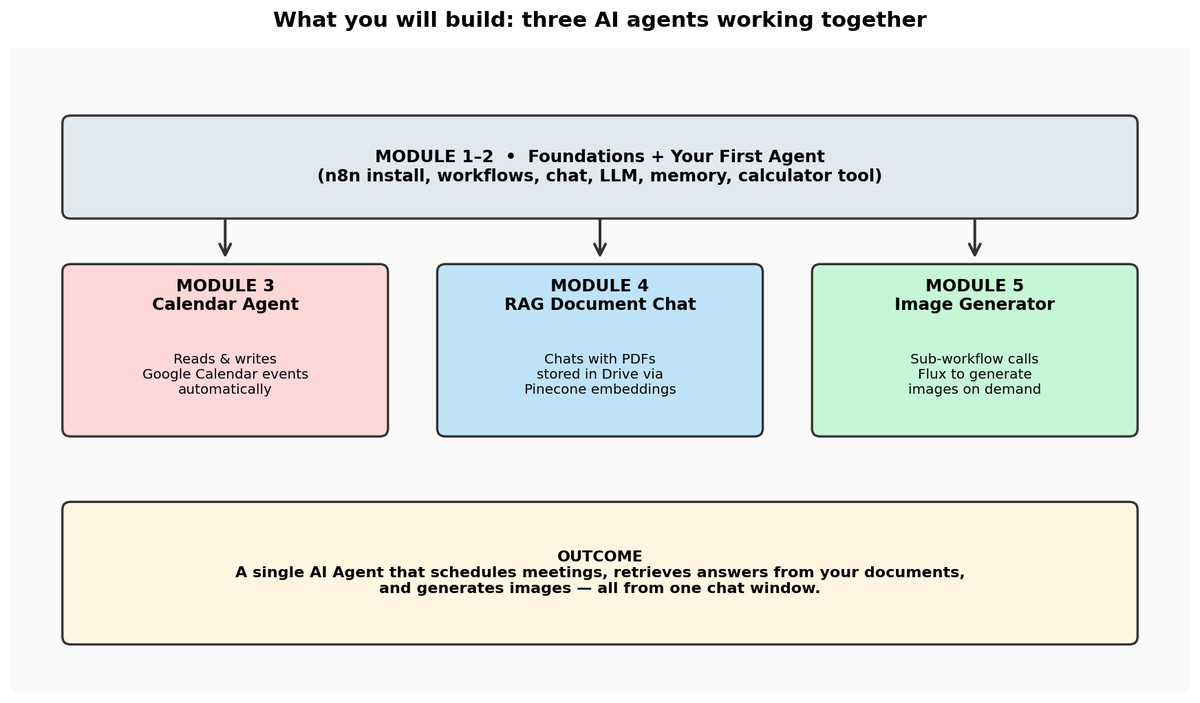
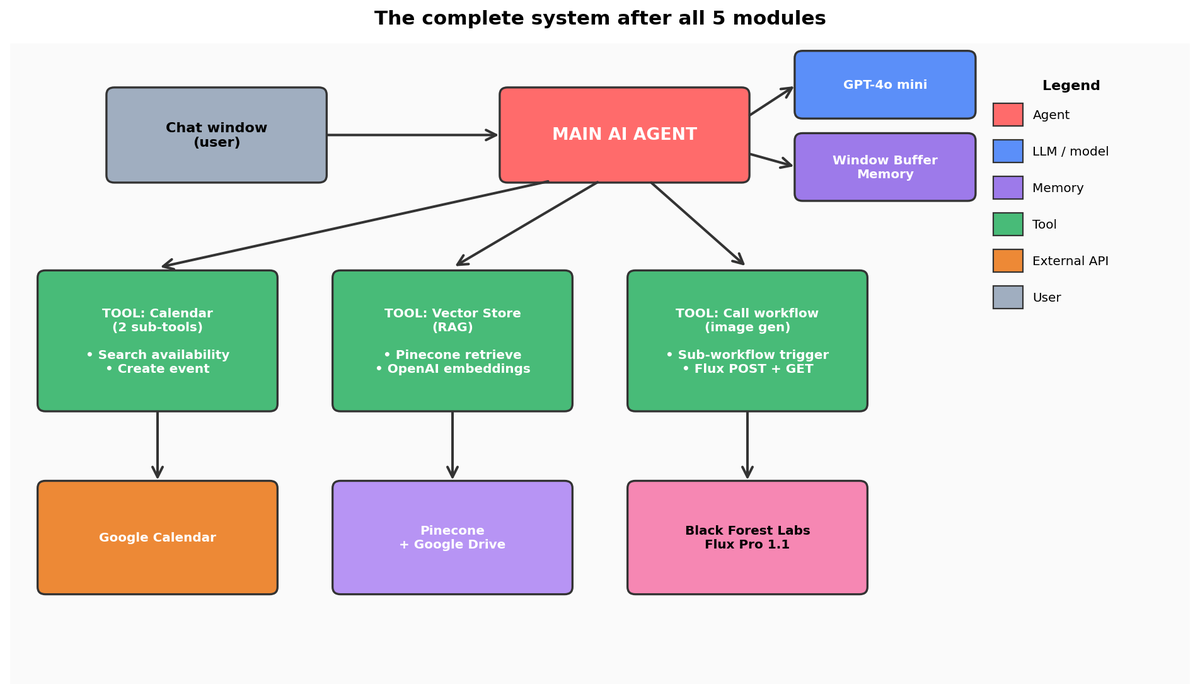
Over five modules, you'll progress from a single chat-bot that does mental arithmetic to one intelligent agent that can read your Google Calendar, search your documents, and generate AI images on demand — all triggered from one chat window. The diagram on the cover shows how the pieces fit together; the architecture diagram at the end of this guide shows the final result.
What you will need before you start
- A computer — macOS, Windows, or Linux. n8n runs anywhere Node.js does.
- Node.js installed — Download from nodejs.org. Required to install n8n via npm.
- A Google account — For Calendar and Drive integrations in modules 3 and 4.
- An OpenAI account — You will load $5–10 of credits for the chat model. Tutorial usage costs only cents.
- A Pinecone account — Free tier is plenty. Sign up at pinecone.io during module 4.
- A Black Forest Labs account — For Flux image generation in module 5. Pay-as-you-go credits.
How to use this guide
Read each module top to bottom, building along as you go. The modules are designed to be completed in order — each one reuses concepts and infrastructure from the previous one. If something on your screen doesn't match what's described, the original video chapter timestamps appear at the start of each section, so you can jump straight to the matching moment. The Troubleshooting Guide near the end covers the most common gotchas.
Key Concepts You Will Meet
Before diving in, here is a quick map of the terms you'll see throughout. Don't try to memorise them — you'll learn each by using it. This page is just a reference you can flick back to.
| Term | What it means |
|---|---|
| Workflow | A diagram of connected nodes in n8n. The unit of automation. You can have many. |
| Node | A single step in a workflow. Examples: a chat trigger, an HTTP request, a Google Calendar action. |
| Trigger | The node that starts a workflow. Could be a chat message, a file upload, a webhook, or a manual click. |
| AI Agent | A special n8n node that wraps an LLM and lets it decide which tools to use. The orchestrator. |
| Chat Model | The LLM that the agent "thinks" with — typically GPT-4o mini in this guide. |
| Memory | Storage for past conversation turns. We use Window Buffer Memory (last N turns). |
| Tool | A capability the agent can choose to invoke. Each tool has a name, description, and parameters. |
| System prompt | A set of instructions you write that defines the agent's role, tone, and rules. |
| Expression | A short JavaScript snippet inside `{{ }}` that lets you reference data from other nodes dynamically. |
| Credential | Stored authentication info (API keys, OAuth tokens) that lets n8n call external services. |
| Sub-workflow | A workflow called by another workflow. Used to keep complex tasks modular. |
| RAG | Retrieval-Augmented Generation — letting an agent search documents instead of stuffing them into the prompt. |
| Vector store | A database of "embeddings" that supports search by meaning rather than exact keywords. |
| Embedding | A list of numbers that represents the meaning of a chunk of text. Similar meanings → similar numbers. |
| Chunk | A small slice of a document (e.g. 500 characters). Documents are chunked before being embedded. |
| OAuth | The authorisation flow Google uses to let third-party apps (like n8n) access your account. |
| Async API | An API where you submit a request and poll later for the result. Flux works this way. |
What you will learn
- What n8n is and why the self-hosted version is a great choice for learning
- How to install n8n locally via npm and open it in your browser
- How the workflow canvas works — nodes, the toolbar, executions, and saving
Concept: what is n8n?
n8n is a workflow automation tool. You build automations by dragging connected boxes ("nodes") onto a canvas. Each node performs one job — read an email, call an API, transform some data, send a Slack message. n8n shines for AI work because it ships with a dedicated AI Agent node that wraps any large language model and lets you bolt on tools, memory, and triggers visually rather than in code.
n8n comes in two flavours: a paid managed cloud version, and a free self-hosted version you run on your own machine. For this tutorial we use the self-hosted version because it is free, runs locally, and lets you experiment freely.
1.1 Why self-host n8n
Video reference: 0:53 – 1:54
Cloud n8n runs 24/7 in someone else's data centre for a monthly fee — convenient for production workflows but unnecessary for learning. Self-hosted n8n runs on your laptop, uses no monthly fee, and gives you full visibility into everything. The only downside is that workflows only run while your machine is on and n8n is running.
1.2 Installing n8n locally
Video reference: 1:54 – 2:33
Prerequisite:
- Node.js installed (download from nodejs.org and follow its installer).
Step 1 Open a terminal
On macOS open Terminal, on Windows open PowerShell or Command Prompt. You can also use the integrated terminal in VS Code if you have it.
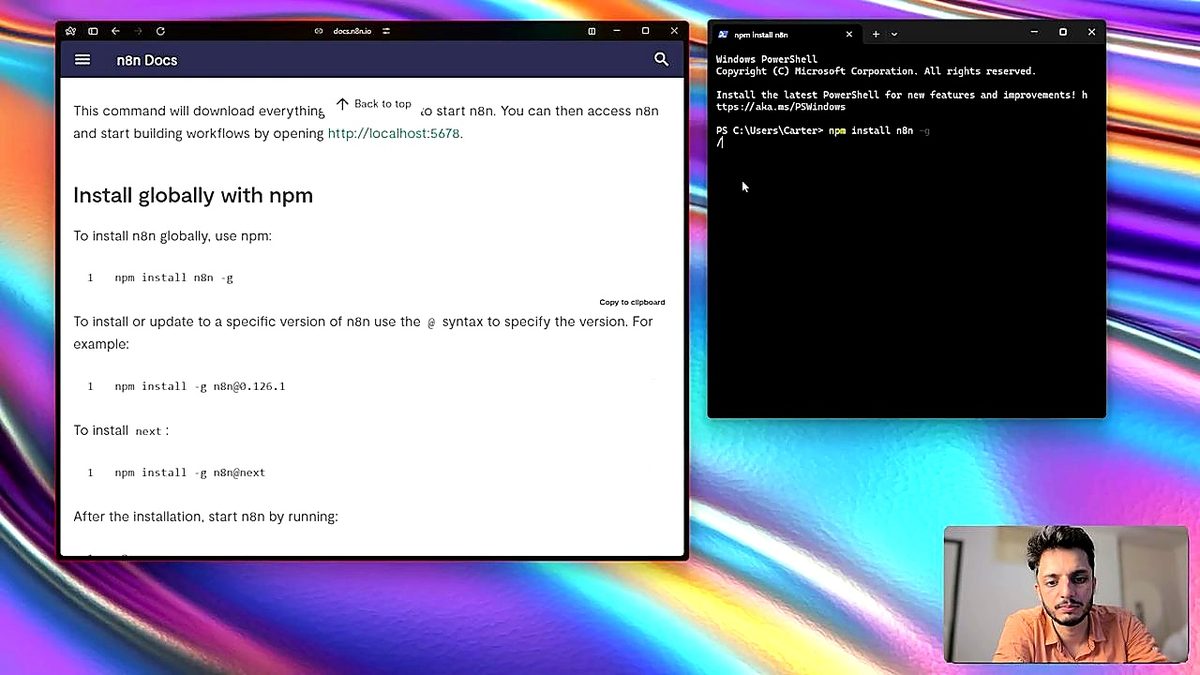
Step 2 Run the global install command
Copy the install command from the n8n docs (it is one line beginning with npm install) and paste it into your terminal. This downloads n8n and installs it globally so you can run it from anywhere.
Step 3 Start the n8n server
Once installation completes, type n8n and press Enter. The terminal will print start-up logs and eventually a localhost URL. Press the letter o while the terminal is focused to automatically open n8n in your browser.
1.3 Tour of the workflow canvas
Video reference: 2:33 – 4:40
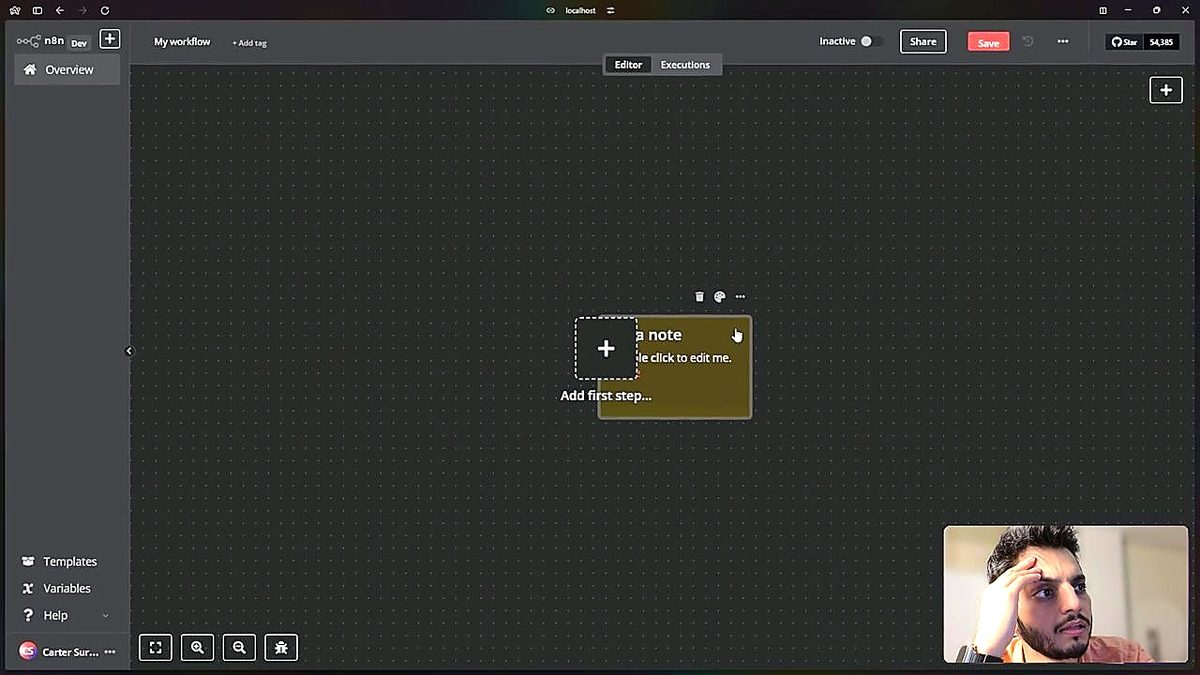
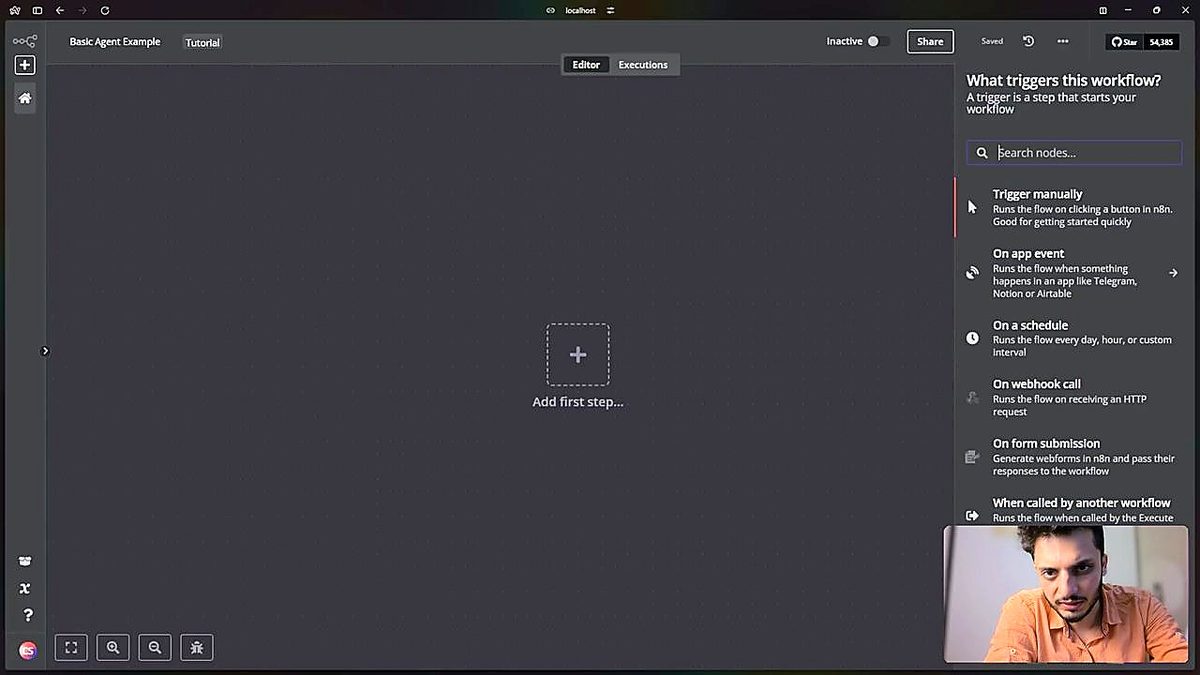
When you open n8n in your browser you land on the workflows overview. Click Start from scratch to open the empty canvas — this is where you'll spend most of your time.
Step 1 Understand the top bar
- The active/inactive toggle turns a workflow on or off (only matters for workflows with triggers that fire automatically).
- The Save button persists your changes — get into the habit of pressing this often.
- In the top-right you can rename, duplicate, or download a workflow.
Step 2 Use sticky notes for organisation
Hover the right edge of the canvas and click Add sticky note. Sticky notes are labelled rectangles you can drop anywhere on the canvas to annotate sections. They are non-functional (they don't run), purely for documentation. Use them to mark the purpose of each region of your flow as it grows.
Step 3 Know your tabs: Editor and Executions
The Editor tab is where you build. The Executions tab logs every run of every workflow — you can drill into any execution to see what data flowed through each node. This becomes your most important debugging tool later, so remember it exists.
Step 4 Browse the Templates library
The Templates tab opens n8n's library of pre-built automations on the n8n website. They are great inspiration once you've mastered the basics — you can import any template as a starting point for a flow.
Step 5 Name your workflow
Click the workflow title in the top bar and rename it to something descriptive like basic agent example. Add a tag like tutorial so you can filter for it later when your workflow list grows.
What you will learn
- The three slots that hang underneath every AI Agent node
- How to connect OpenAI as the agent's "brain"
- How memory lets the agent remember earlier turns of a conversation
- How to add a simple tool (the Calculator) and watch the agent decide when to use it
Concept: the anatomy of an agent
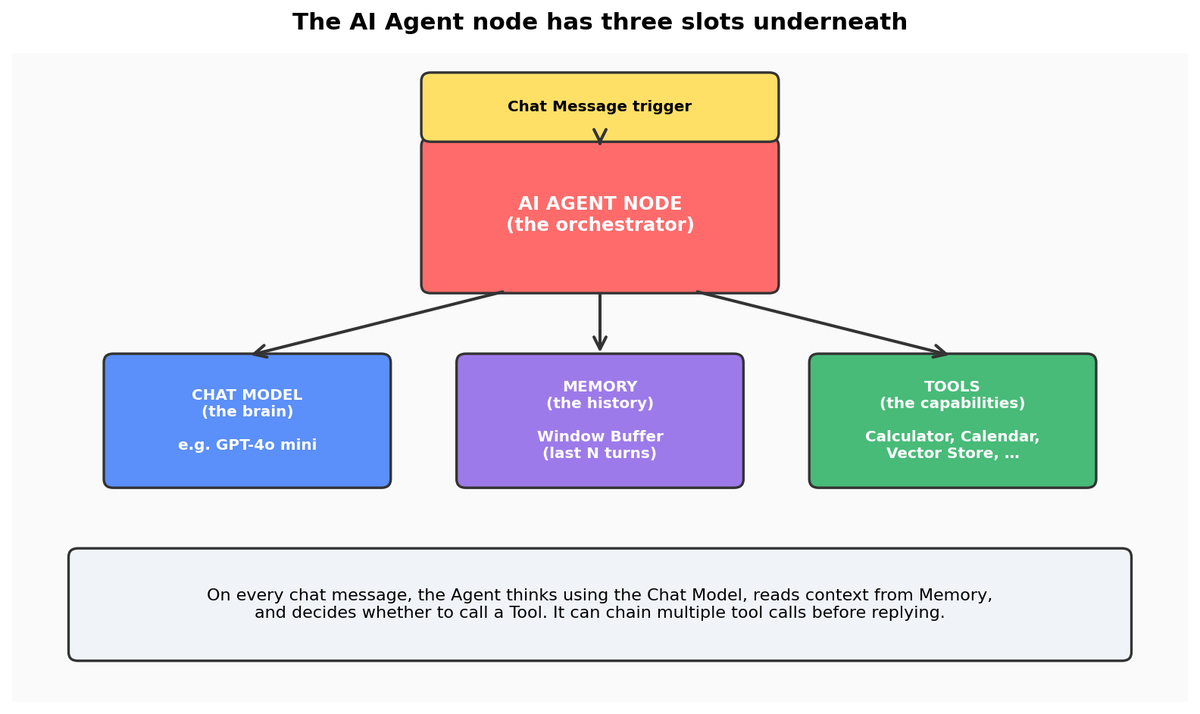
An AI Agent in n8n is essentially an LLM with three plug-in slots underneath. Think of the agent as the orchestrator: it receives a chat message, uses its chat model to think about what to do, optionally calls one or more tools, and replies. Memory lets the conversation carry forward across turns. The diagram below shows the structure you'll build in this module.
2.1 Adding a chat trigger
Video reference: 4:40 – 5:37 (Chapter 5)
Every workflow needs a trigger — the event that starts it running. For a conversational agent the most natural trigger is a chat message. n8n ships a native Chat Message trigger that gives you an in-app chat window for testing, no front-end work needed.
Step 1 Add the Chat Message trigger
Click the plus button at the centre of the empty canvas, then select the Chat Message trigger from the list. n8n places the node on the canvas.
Step 2 Document the node (optional but encouraged)
Open the node's Settings tab and add a short note describing what the trigger does (for example, this is where the user types). Enable the toggle that displays the note inline on the canvas. As your workflows grow, these notes save you from having to remember what each node was for.
Step 3 Rename the node
Click the three-dot menu on the node and choose Rename to give it a clear label like chat input. Then click Back to canvas to return to the workflow view.
2.2 Adding the AI Agent node
Video reference: 5:37 – 6:14 (Chapter 6)
Step 1 Add the agent
Click the plus button after the chat trigger, expand the Advanced AI category, and choose AI Agent. The prompt source automatically wires up to your chat trigger — so the user's message flows straight in.
Step 2 Confirm the prompt source binding
Inside the AI Agent node, leave the prompt source set to the connected chat trigger. You'd only override this if you needed a custom prompt input from somewhere else.
Step 3 Notice the three sub-slots
Back on the canvas, the AI Agent node now exposes three connection points underneath: Chat Model, Memory, and Tool. These are where you'll plug in the brain, the history, and the capabilities respectively. You can leave Memory and Tool empty for now, but Chat Model is mandatory — without one the agent has no model to think with.
2.3 Connecting OpenAI as the chat model
Video reference: 6:14 – 7:46 (Chapter 7)
We'll use OpenAI's GPT-4o mini — it's cheap, fast, and more than capable for everything in this tutorial. You'll need an OpenAI account with a small balance loaded (five or ten dollars is plenty for the whole guide).
Step 1 Open the Chat Model slot
Click the Chat Model slot beneath the AI Agent and choose OpenAI from the list of providers.
Step 2 Create OpenAI credentials in n8n
Click Select credential, then Create new credential. n8n will prompt you for an API key.
Step 3 Generate the OpenAI API key
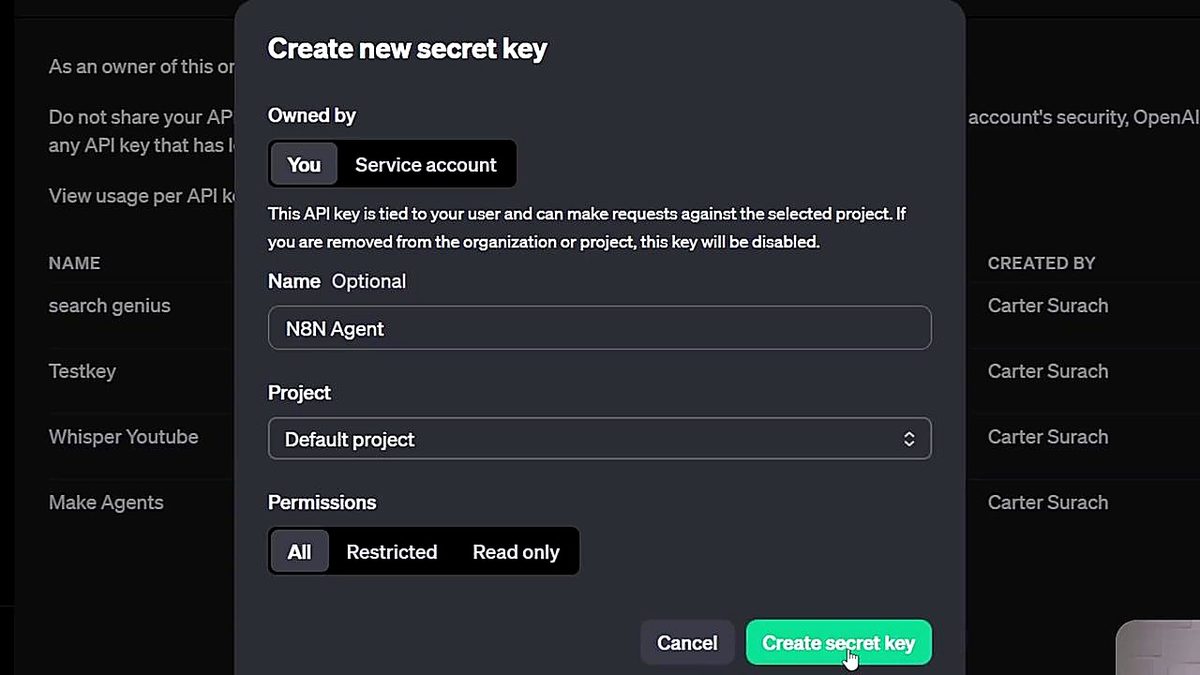
In a new tab, go to platform.openai.com. Open Settings → Billing and add a small balance (five or ten dollars). Then open API keys, click Create new secret key, name it n8n agent, and assign it to the default project. Copy the key immediately — OpenAI only shows it once.
Step 4 Paste the key into n8n
Return to n8n, paste the secret key into the API key field, and rename the credential to n8n agent so it matches your OpenAI dashboard entry. Click Save.
Step 5 Pick a model
Close the credentials modal and choose a model from the dropdown. Select GPT-4o mini to keep costs low while you're learning.
2.4 Adding memory
Video reference: 7:46 – 8:27 (Chapter 8)
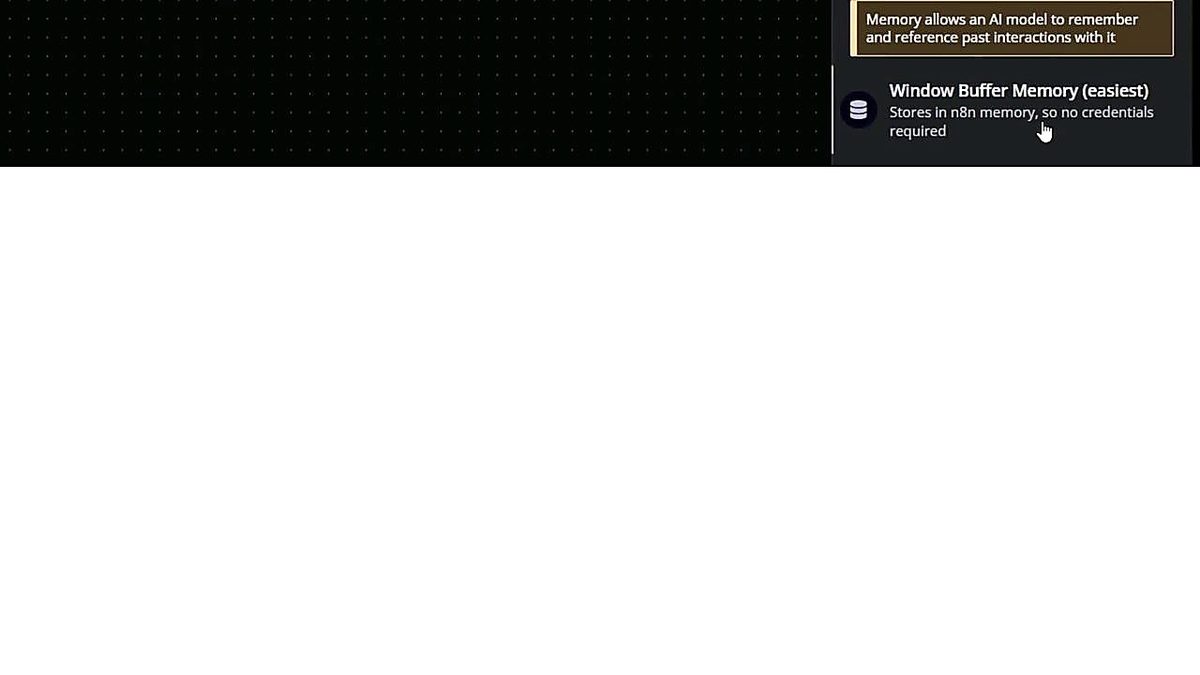
Without memory, every turn of the chat starts from scratch — the agent has no idea what you said three messages ago. Window Buffer Memory is the simplest memory type: it just feeds the last N turns of the conversation back into the model on every new message.
Step 1 Attach Window Buffer Memory
Click the Memory slot under the AI Agent and select Window Buffer Memory.
Step 2 Confirm the context window length
Leave the context window length at 5. This means the agent receives the last five interactions as context on every turn. Bigger window = more remembered, but every remembered turn is paid for in tokens on every new message, so don't go wild.
Step 3 Verify the session ID source
The memory node pulls its session ID from the connected Chat Message trigger automatically, so the same chat session continues to share memory without any extra wiring. You can leave this on auto.
2.5 Your first tool — the Calculator
Video reference: 8:27 – 8:50 (Chapter 9)
The Calculator is the simplest tool n8n offers — no parameters to configure, no credentials to set up. It's the ideal smoke test: if the agent can pick up a calculator when asked maths, your wiring works.
Step 1 Add the Calculator tool
Click the plus on the Tool slot, type calculator into the search box, and select the Calculator tool.
Step 2 Save the workflow
Click Back to canvas and Save the workflow. The agent is now ready to test.
2.6 Testing the agent
Video reference: 8:50 – 10:27 (Chapters 10–11)
Step 1 Open the chat panel
Click the Chat button at the bottom of the canvas to open the in-app chat window.
Step 2 Send a non-math question first
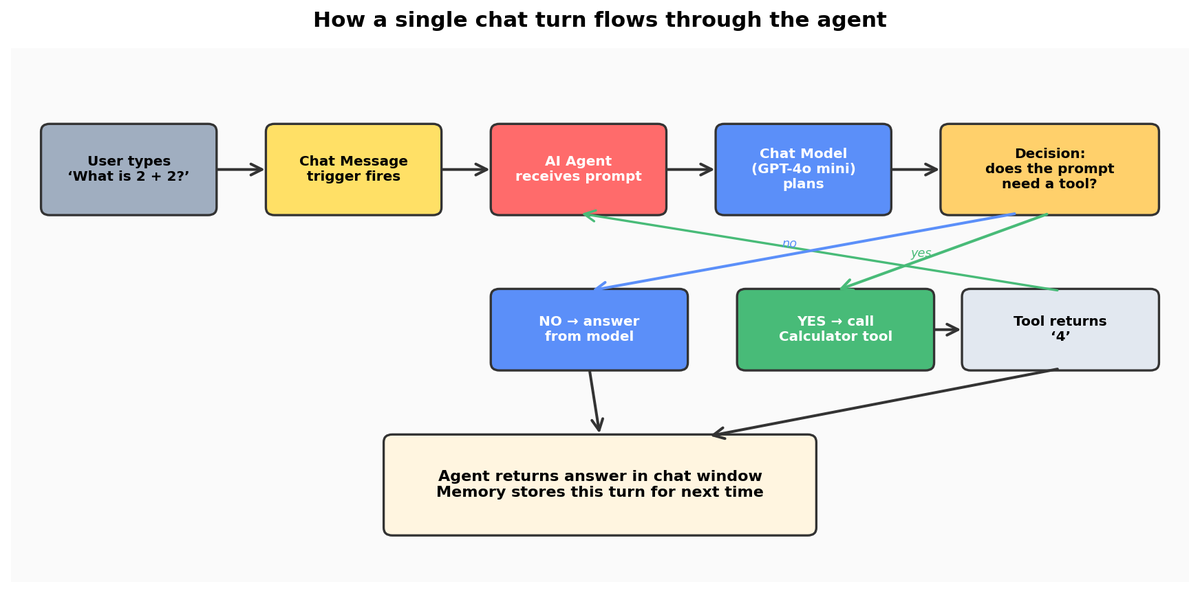
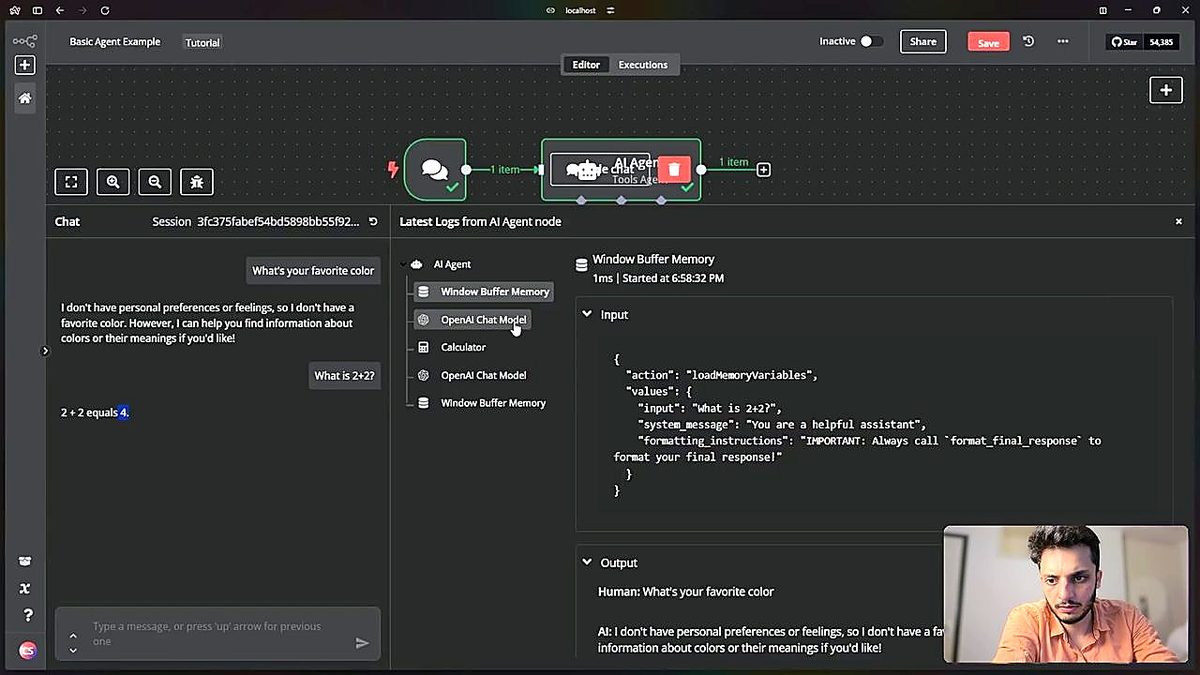
Type something like "what is your favorite color". The agent should reply directly using just the chat model — it should not invoke the calculator, because no maths is needed. Slide the chat panel down and look at the canvas: OpenAI lit up, Memory was checked, Calculator stayed grey. That's correct behaviour.
Step 3 Now send a math question
Ask "what is 2 + 2". This time the agent should choose to call the Calculator tool. Click through the execution tree to see the agent pass 2+2 to the calculator, receive 4 back, and return the answer to chat.
Step 4 Confirm memory persisted the exchange
Try a follow-up like 'and what about that times five?'. The agent should know from memory that you mean the previous result. That's Window Buffer Memory doing its job.
Step 5 Browse the Executions tab
Close the chat and open the Executions tab. Every run is logged here, and you can drill into any one to replay what happened internally. This view will become your most-used debugging tool from here on.
Step 6 Clear the chat to start fresh
Back in the editor, click Clear chat to wipe execution data and start with empty memory. Note: this is destructive — the executions for that session are gone.
What you will learn
- How to set up Google OAuth credentials for n8n (the long-ish but one-time setup)
- How to give the agent two tools (read availability and create events) that work together
- Why one tool isn't enough — agents need both "read" and "write" capabilities
- How to write a system prompt that shapes agent behaviour
- A common gotcha: agents don't know today's date unless you tell them
- How to fix tool output formats and time zones when results look wrong
Concept: making agents useful
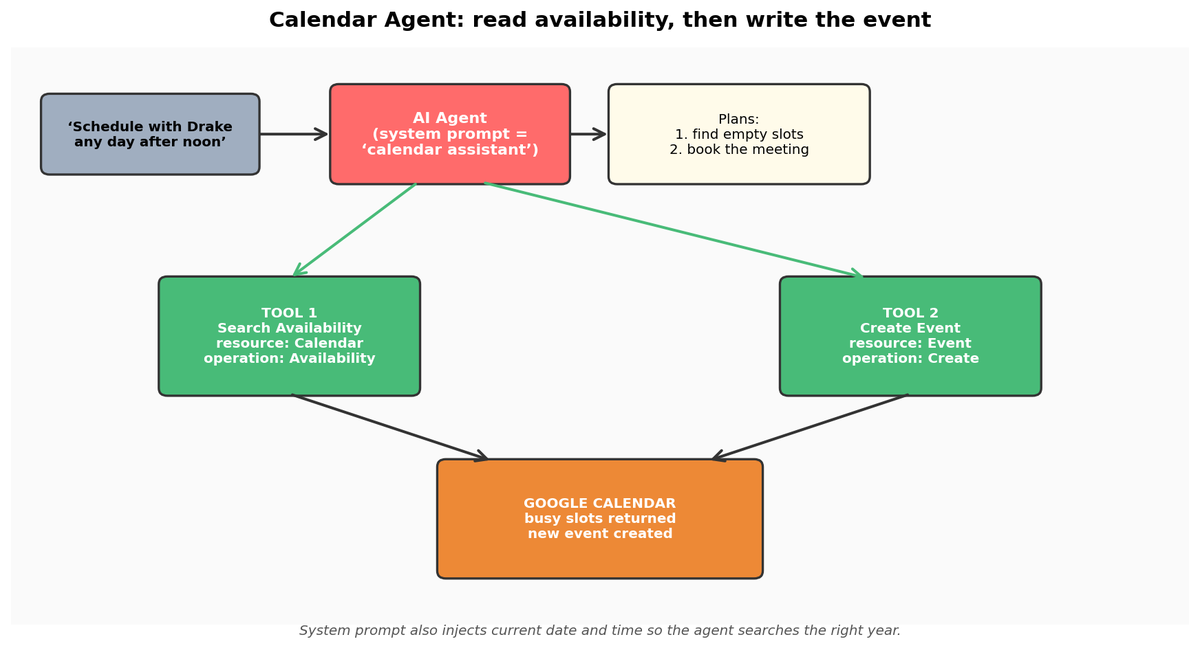
The calculator agent demonstrates the mechanism. The calendar agent shows the value. Most real-world tasks need agents that can both read state (what's already on my calendar?) and write state (add a meeting). That combination — read and write tools for the same resource — is what we'll wire up in this module.
3.1 From toy to useful
Video reference: 10:27 – 12:10 (Chapters 12–13)
We'll reuse the same workflow from module 2, but swap the Calculator out for Google Calendar tools. The agent will keep its chat model and memory.
Step 1 Remove the Calculator tool
On your existing agent, delete the Calculator tool from the Tool slot so the slot is empty.
Step 2 Add the first Google Calendar tool
Click the Tool slot, search for and select the Google Calendar tool. You'll immediately be prompted to attach credentials — that's the next section.
3.2 Connecting Google Calendar via OAuth
Video reference: 12:10 – 14:35 (Chapter 14)
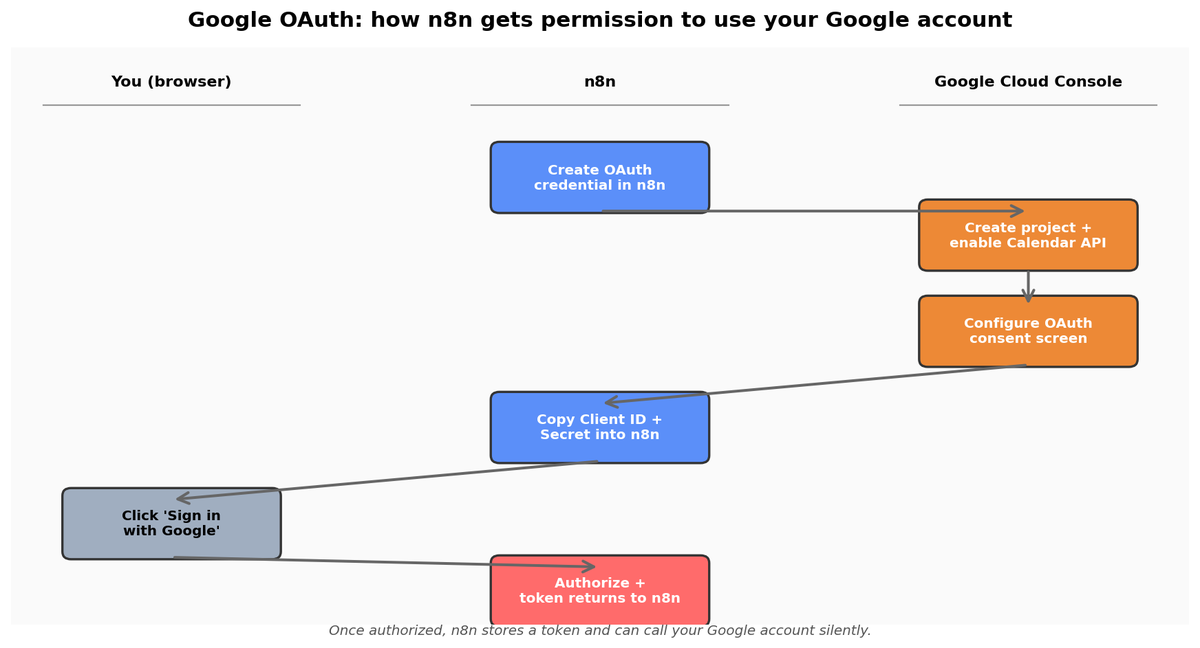
This is the longest step in the whole tutorial, but you only do it once. Google needs you to register an "application" (n8n) in Google Cloud Console, enable the Calendar API for it, and authorise it to act on behalf of your Google account. The diagram below shows the dance:
Step 1 Open n8n credential setup
In the Google Calendar tool, click Select credential and Create new credential, choosing the OAuth flow. Open the documentation link n8n provides for the canonical step-by-step with the latest screenshots.
Step 2 Create a Google Cloud project
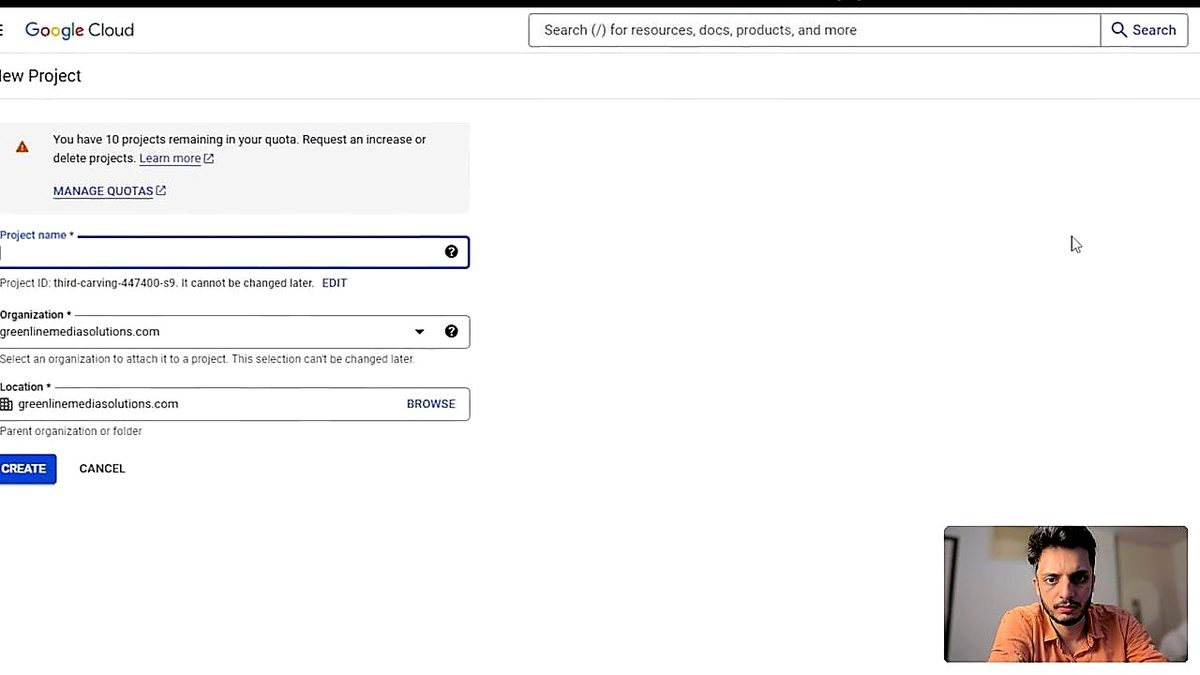
Go to console.cloud.google.com, sign in, and click New Project. Name it n8n agent and click Create. Select the project from the project picker so you're inside it.
Step 3 Enable the Google Calendar API
Open APIs & Services from the sidebar, click Enable APIs and Services, search for calendar, and choose Google Calendar API (not CalDAV — that's a different protocol). Click Enable.
Step 4 Configure the OAuth consent screen
Click Create credentials and select User data. Name the app (e.g. n8n agent), add a support email and developer contact email, then click Save and continue. You can skip the optional scope configuration for now.
Step 5 Create an OAuth client ID
Choose Web application as the application type and name it n8n agent. Under Authorized redirect URIs, click Add URI and paste the redirect URL n8n shows you in the credential dialog. Click Create.
Step 6 Copy client ID and secret into n8n
Copy the generated client ID and paste it into the n8n credential dialog. Then click Edit OAuth client in Google Cloud, copy the client secret, and paste it into n8n's secret field.
Step 7 Authorise the connection
Click Sign in with Google in n8n, choose the Google account that owns the calendar you want to use, and click Allow. When the success page reports Got connected, close it and return to n8n. You should see the credential is now attached.
3.3 The Create Event tool
Video reference: 14:35 – 16:00 (Chapters 15–17)
Now we configure the first calendar tool — the one that creates new events.
Step 1 Write a manual tool description
Switch the tool description from automatic to manual and enter a clear sentence such as: this is the tool you use to create calendar events. The description is how the agent decides whether to call the tool — vague descriptions cause the agent to skip or misuse it.
Step 2 Set resource and operation
Change the resource to Event and the operation to Create. Resource + operation together define what API action the tool performs.
Step 3 Select the target calendar
Pick your personal calendar from the dropdown so events land in the right place.
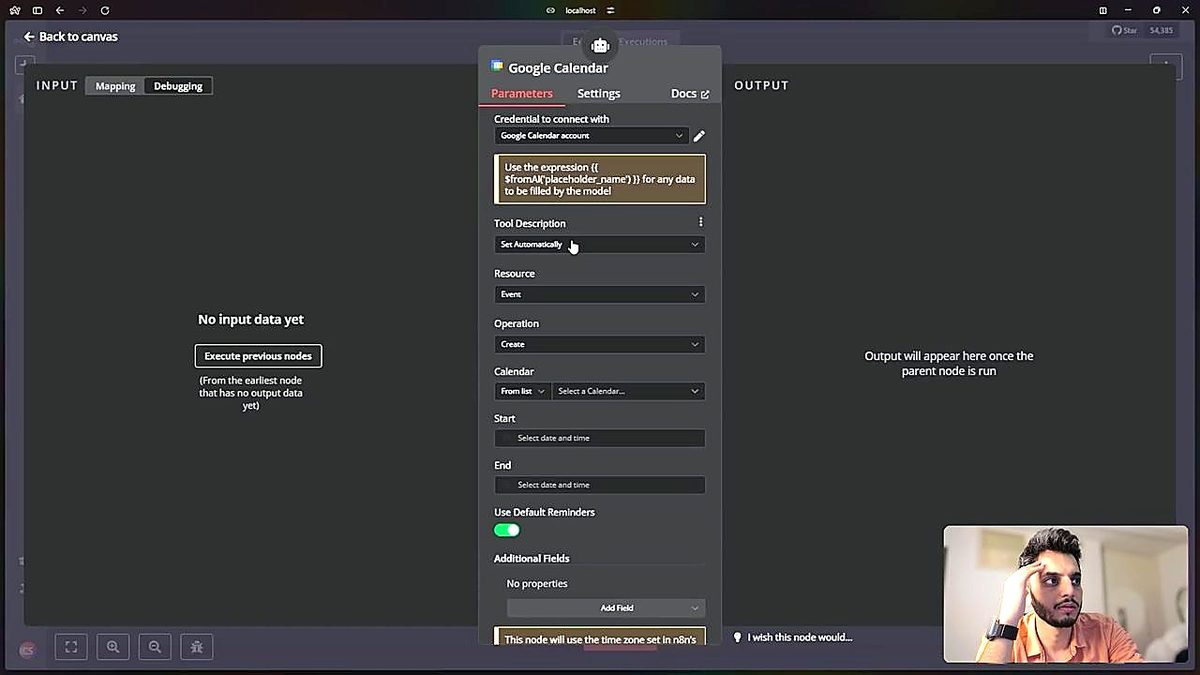
Step 4 Bind the start date to an expression
Click the start date field, toggle it to expression mode, and reference the agent-provided variable by naming it startor date. This tells the agent: when you call this tool, supply a field called start date and I'll use it as the event's start time.
Step 5 Repeat for the end date
Copy the same expression, paste it into the end date field, and rename the variable to end date. The agent will now decide both dates at runtime.
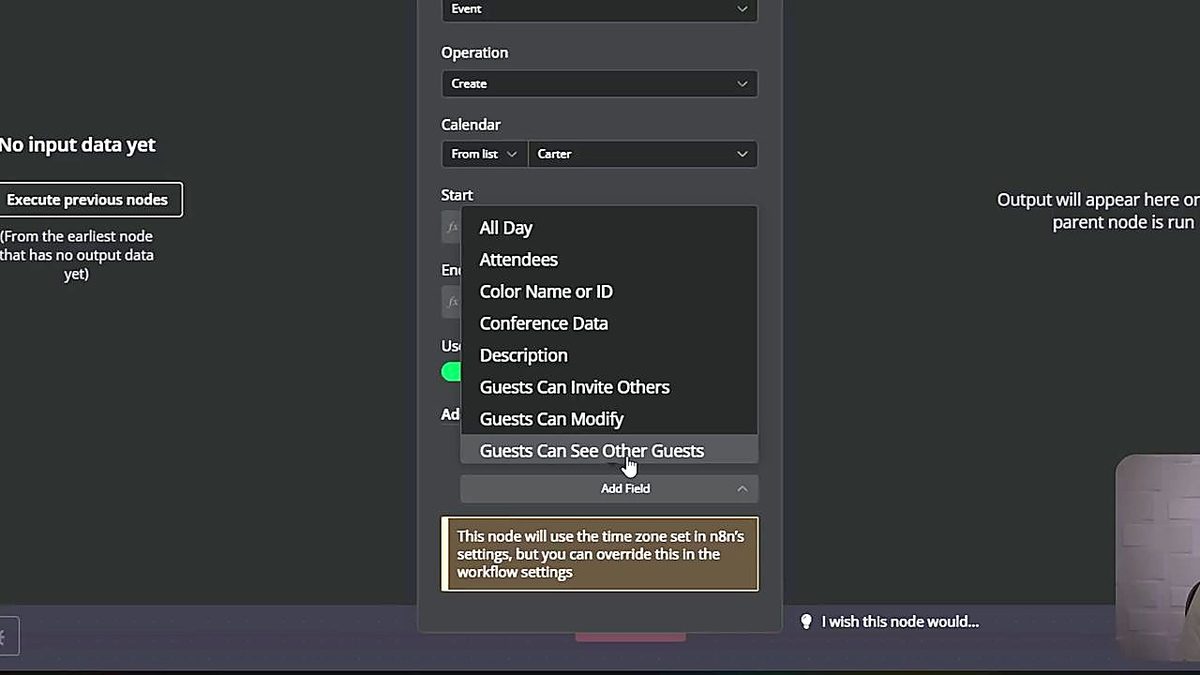
Step 6 Add optional summary and description fields
Click Add field and add a Summary field in expression mode, naming the variable summary. Add another field for Description, also in expression mode. The agent can now title and describe each event it creates.
3.4 The Search Availability tool
Video reference: 16:32 – 17:50 (Chapters 18–19)
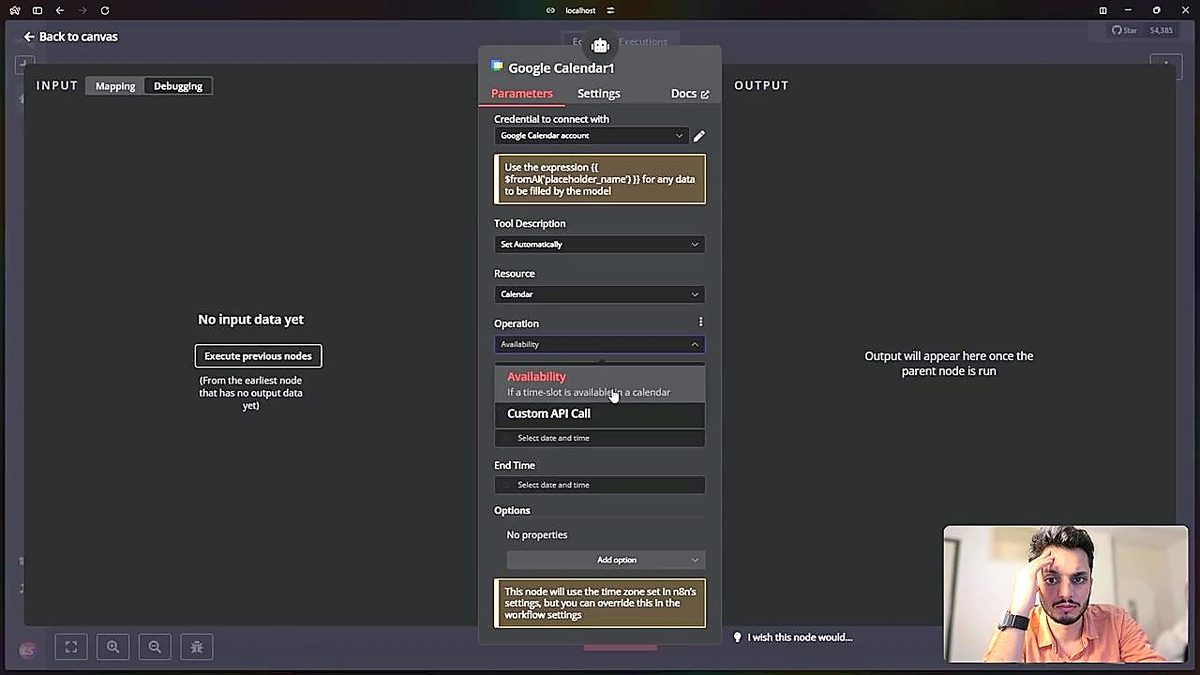
The Create Event tool can add events, but the agent has no way to see what's already on the calendar — which means it'll happily double-book you. We solve this with a second Google Calendar tool, this one configured to read availability.
Step 1 Add another Google Calendar tool
Click the plus on the Tool slot and choose Google Calendar again. Set resource to Calendar and operation to Availability.
Step 2 Select your calendar
Pick the same personal calendar from the dropdown.
Step 3 Bind start time and end time
Toggle expression mode for both fields, paste the same expression pattern, and name the variables start time and end time so the agent can supply the search window when it calls the tool.
Step 4 Write a manual description
Set the tool description manually to: this tool is for searching for available time slots in my calendar. This tells the agent when to call it.
3.5 Writing a system prompt
Video reference: 17:50 – 19:26 (Chapter 20)
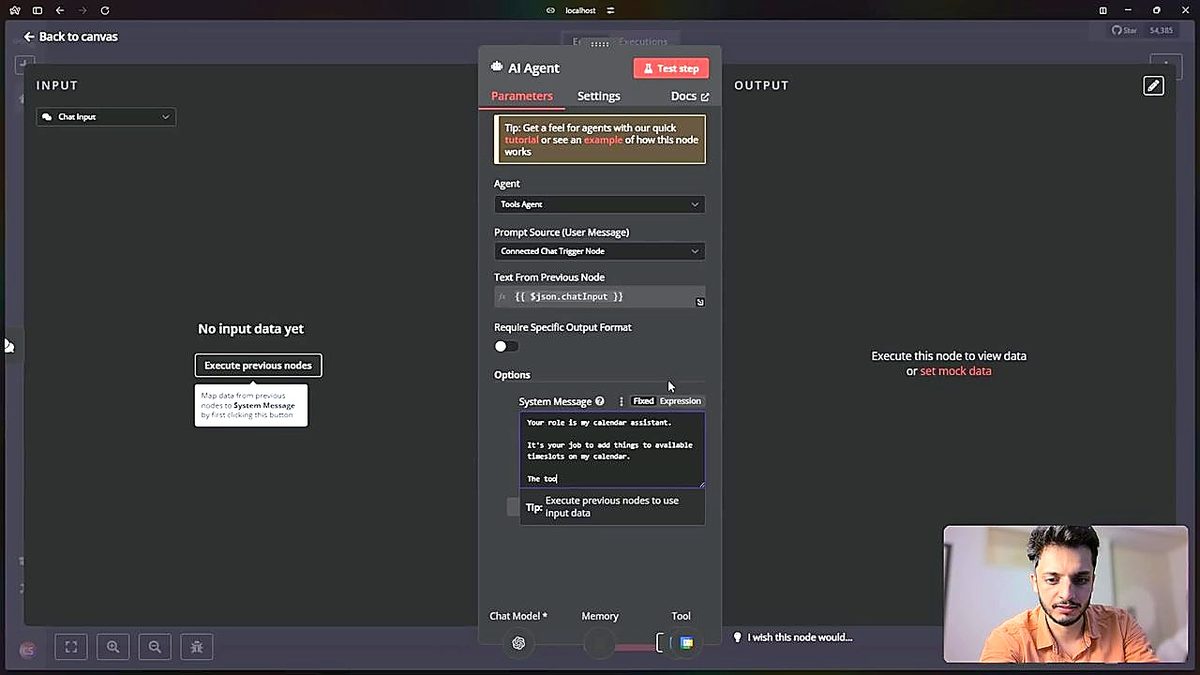
A system prompt is your chance to define the agent's role, tone, and decision rules in one place. Without one, the agent has tools but no guidance about how to use them.
Step 1 Open the agent's options
Click into the AI Agent node, click Add option, and select System message.
Step 2 Write a focused role description
Keep the system prompt short and specific. A good starting prompt:
3.6 Giving the agent date awareness
Video reference: 19:26 – 21:44 (Chapters 21–22)
Now for the first surprise. Ask the agent: "give me my available time slots for the rest of this month". Inspect the Search Availability call and you'll discover it searched 2023 (or some other random year). Why? Because LLMs don't know today's date — they only know what you've told them, and the training data ends at some point in the past.
Step 1 Add a date placeholder to the system prompt
Append a line such as today's date is to the system message and toggle expression mode so n8n will evaluate any JavaScript you put inside braces.
Step 2 Read the expressions docs
Click Learn more inside the expression dialog to open n8n's expression docs. They list the helpers available — most importantly the DateTime helper based on Luxon.
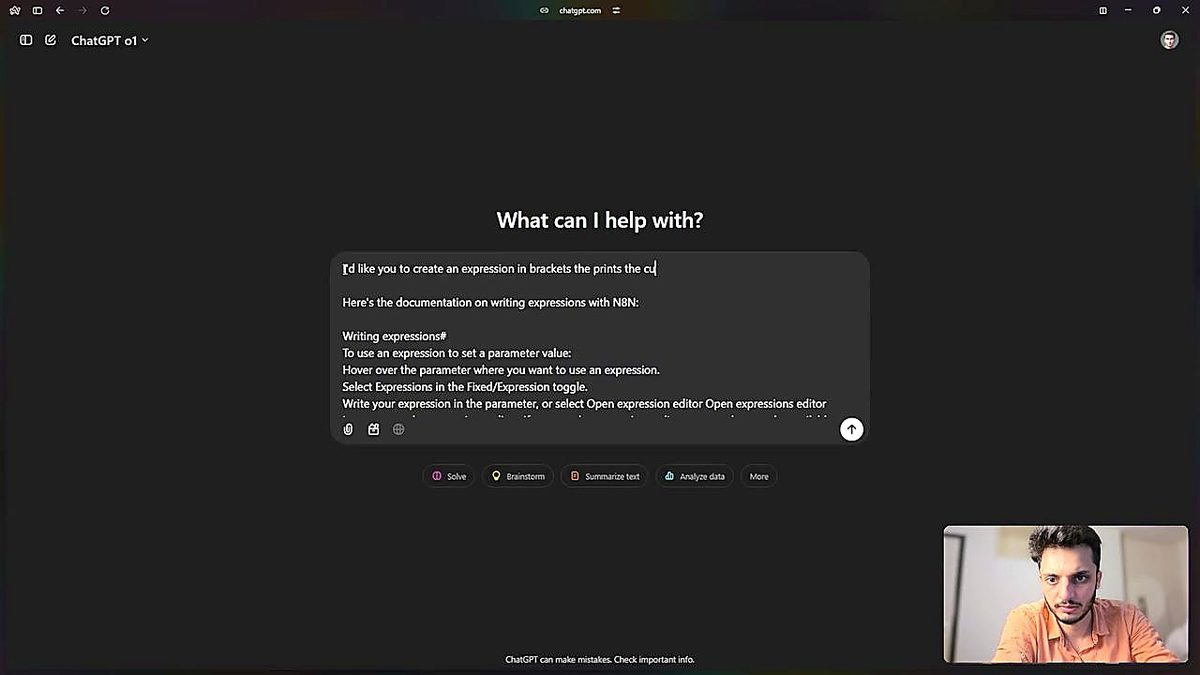
Step 3 Have ChatGPT generate the expression
Open ChatGPT, paste the n8n expression docs, and ask: "write an n8n expression that prints the current date and time in Eastern Time". You'll get back something like:
Step 4 Paste the expression into n8n
Copy the snippet, paste it into the system prompt's expression field, and confirm the live preview shows the correct current date and time before clicking Back to canvas. Always verify the preview — a wrong time zone here will break every time-sensitive query.
3.7 Troubleshooting and successful booking
Video reference: 21:44 – 23:30 (Chapters 23–25)
Even after you fix the date, the availability tool may still report nothing useful. There are two more knobs to turn before the agent will work properly.
Step 1 Set the time zone on the availability tool
Open the Search Availability tool, click Add option, and add a Time zone field set to New York / US Eastern (or your local zone). Without this, the calendar API returns windows in UTC and the agent misinterprets them.
Step 2 Set the output format to Raw
Add an Output format option. The tool offers three options: availability boolean, busy slots, or raw. Pick Raw — it returns everything the API gave, letting the agent reason about gaps for itself rather than trusting the tool's pre-baked answer.
Step 3 Rename both tools for clarity
Rename the availability node to search availability and the create event node to create event. Consistent, descriptive names make debugging far easier when you later watch executions.
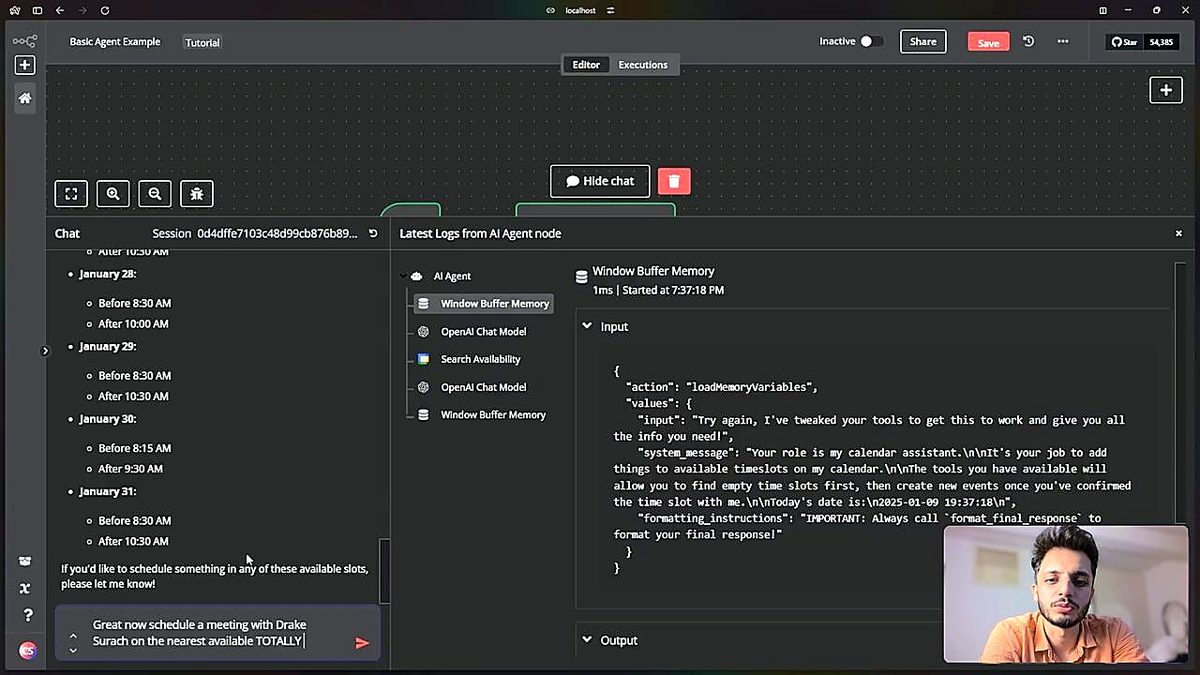
Step 4 Re-test availability
In the chat, tell the agent: "try again, I've tweaked your tools". This time it should return a list of available windows for the remainder of the month.
Step 5 Schedule a real meeting
Ask the agent: "schedule a meeting with Drake Surratt on the nearest available totally empty day, anytime after noon". The agent should now use availability data from memory and go straight to Create Event, booking a slot from noon to 1pm on the chosen day.
Step 6 Verify the event in Google Calendar
Click the returned event URL to open the meeting directly in Google Calendar and confirm it landed correctly. Always sanity-check newly created events in the real calendar before trusting an agent in production.
3.8 Tips for dealing with chaos
Video reference: 24:09 – 24:42 (Chapter 26)
The calendar agent did not work on the first, second, or even third try in the original tutorial — and yours probably won't either. That's normal. A few habits that will save you:
- Persistence beats cleverness — Keep iterating Don't rewrite the agent after one bad run. Read what actually happened.
- Read the data — Inspect each execution Click into each execution to see exact inputs and outputs at every node. This usually reveals the real bug faster than guessing.
- ChatGPT is your assistant — Ask AI for unfamiliar syntax Pasting the n8n expression docs into ChatGPT and asking for a one-liner is the canonical way to handle expressions you don't know how to write.
What you will learn
- What RAG (Retrieval-Augmented Generation) is, and when to use it
- How to build a separate workflow that ingests files from Google Drive into Pinecone
- How chunking and embeddings turn documents into searchable vectors
- How to add a Vector Store retrieval tool to your existing agent
- How to test grounded answers and force tool usage when the agent hesitates
Concept: what is RAG?
LLMs have a context window — a fixed amount of text they can consider at once. If your documents don't fit (or you don't want to pay to send them every time), you need a smarter approach: store the documents elsewhere, and let the agent search them on demand.
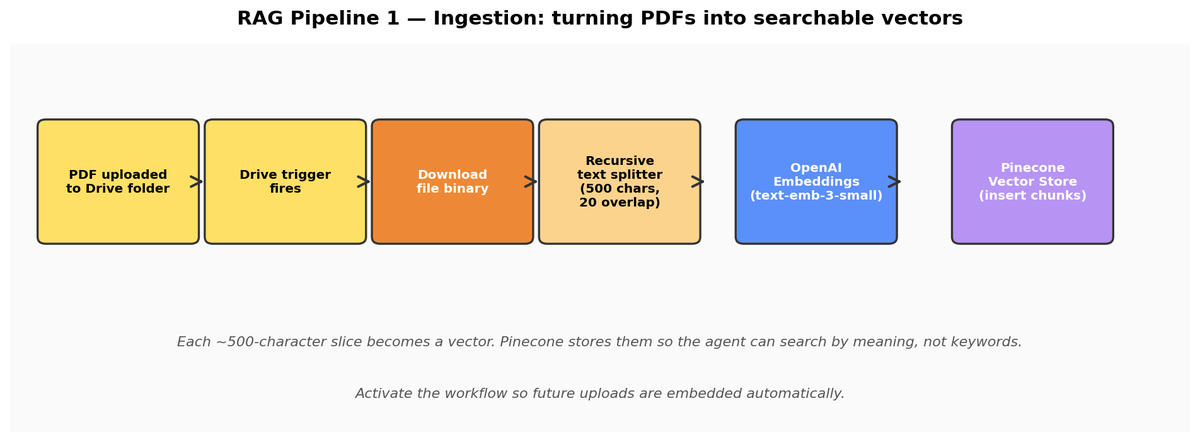
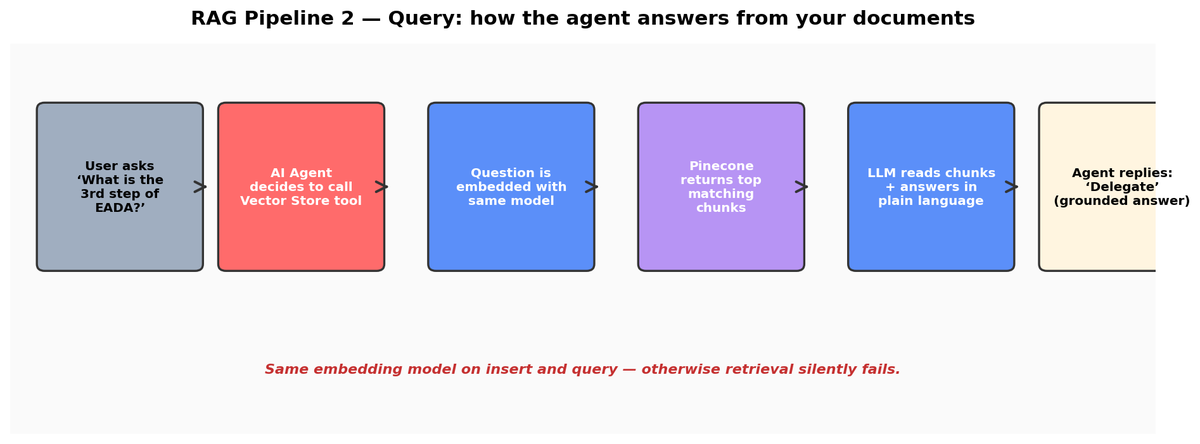
That's RAG. It has two halves. First — ingestion — you chunk each document, turn each chunk into a numerical embedding, and store those vectors in a database (Pinecone in our case). Second — retrieval — when the user asks a question, the agent embeds the question, finds the most similar chunks, and uses them to answer.
4.1 Setting up the ingestion workflow
Video reference: 24:42 – 25:36 (Chapters 27–28)
We'll build the ingestion side first as a separate workflow. It watches a Google Drive folder, and whenever a PDF lands there it chunks the file and stores the chunks in Pinecone.
Step 1 Save the calendar workflow and return to the overview
Confirm your calendar workflow shows Saved at the top, then click back to the workflows overview.
Step 2 Create a new workflow
From the overview, create a new workflow. We'll rename it later — for now just open the canvas.
Step 3 Add a Google Drive trigger
Click Add first step, search for drive, expand On app event, and pick Google Drive. From the trigger sub-list, choose the trigger named On changes involving a specific folder.
4.2 Connecting Google Drive
Video reference: 25:36 – 26:40 (Chapter 29)
Good news: you already did 90% of this work in module 3. You can reuse the same Google Cloud project — you just need to enable the Drive API on it.
Step 1 Enable the Google Drive API
In Google Cloud Console, make sure you're inside the n8n agent project. Go to APIs & Services, click Enable APIs and Services, search drive, and enable the Google Drive API.
Step 2 Reuse OAuth client credentials in n8n
Open the existing OAuth credentials, copy the client ID, and paste it into a new Google Drive credential in n8n.
Step 3 Copy the client secret
Click the edit-pencil on the OAuth client in Google Cloud to reveal the client secret and paste it into n8n's secret field.
Step 4 Register the new redirect URL
Copy the redirect URL from the n8n Drive credential and add it as an Authorized redirect URI on the OAuth client in Google Cloud. Each n8n integration needs its own redirect registered — forgetting this step is the most common cause of OAuth errors here.
Step 5 Sign in and authorise
Click Sign in with Google in n8n, pick the Drive account, and click Allow to complete the OAuth handshake.
4.3 Pointing the trigger at a folder
Video reference: 26:40 – 28:45 (Chapters 30–31)
Step 1 Create a new Google Drive folder
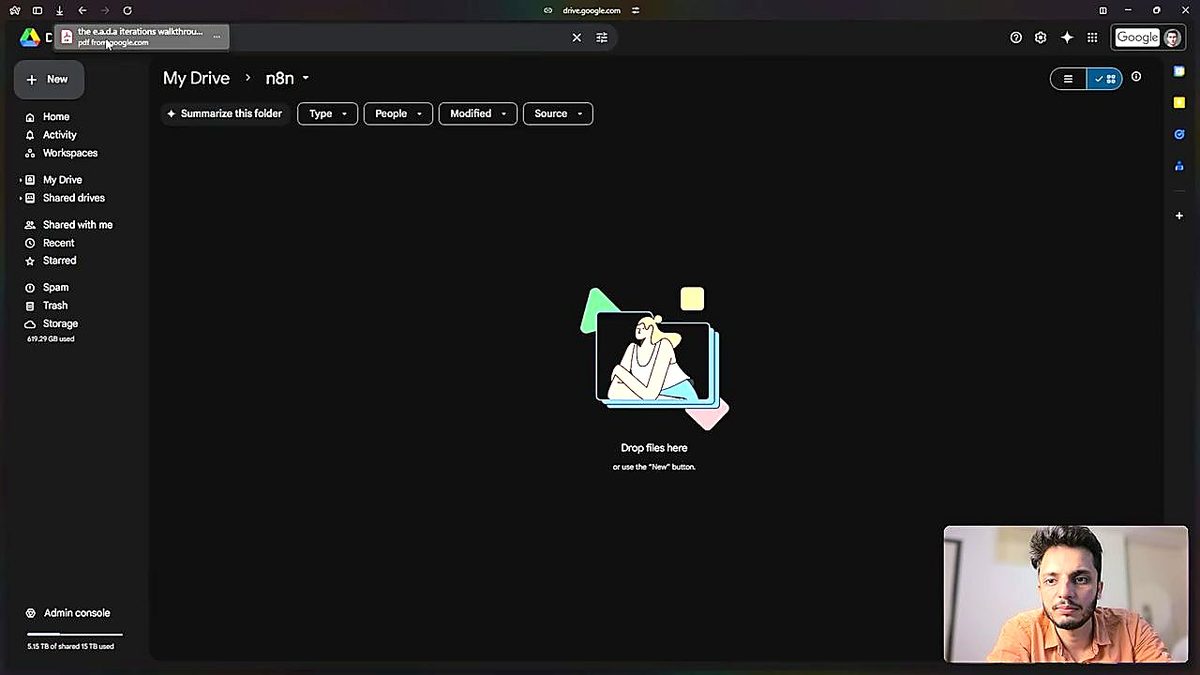
In Google Drive, click New → New folder, name it n8n, and click Create. Open the folder.
Step 2 Upload a test PDF
Drag a sample PDF into the folder. Use something meaningful that you'd like to query later — the original tutorial uses a personal productivity document on the "EADA" method.
Step 3 Configure the Drive trigger
Back in your n8n workflow, open the Google Drive trigger node. Set Mode to Every minute, Trigger on to Changes involving a specific folder, then use the folder picker to select your n8n folder. Set Watch for to File created so the trigger only fires on new uploads.
Step 4 Fetch a test event
Click Fetch test event. n8n will pull metadata for the PDF you just uploaded, which gives you live data to wire downstream nodes against.
Step 5 Add a Google Drive Download node
Click the plus after the trigger, search for Drive, and choose Google Drive → Download file. This will actually fetch the file binary, not just its metadata.
Step 6 Bind the file ID dynamically
Switch the file input to expression mode, ensure By ID is selected, and drag the ID field from the trigger's output into the field. The latest uploaded file's ID will flow in automatically. By-ID is more reliable than filename matching because filenames can change.
Step 7 Test the download step
Click Test step and confirm the node returns the PDF binary, then click Back to canvas.
4.4 Connecting Pinecone
Video reference: 28:45 – 29:59 (Chapter 32)
Pinecone is the vector database that will hold the embedded chunks of your documents. The free tier is generous enough for the whole tutorial.
Step 1 Sign up for Pinecone
Go to pinecone.io, click Sign up, and complete the onboarding survey.
Step 2 Create an index
Open Database → Indexes and click Create index. Name it n8n, choose the text-embedding-3-small preset (which sets the dimensions correctly for OpenAI's small embedding model — they must match), leave the host as serverless, and click Create index.
Step 3 Generate an API key
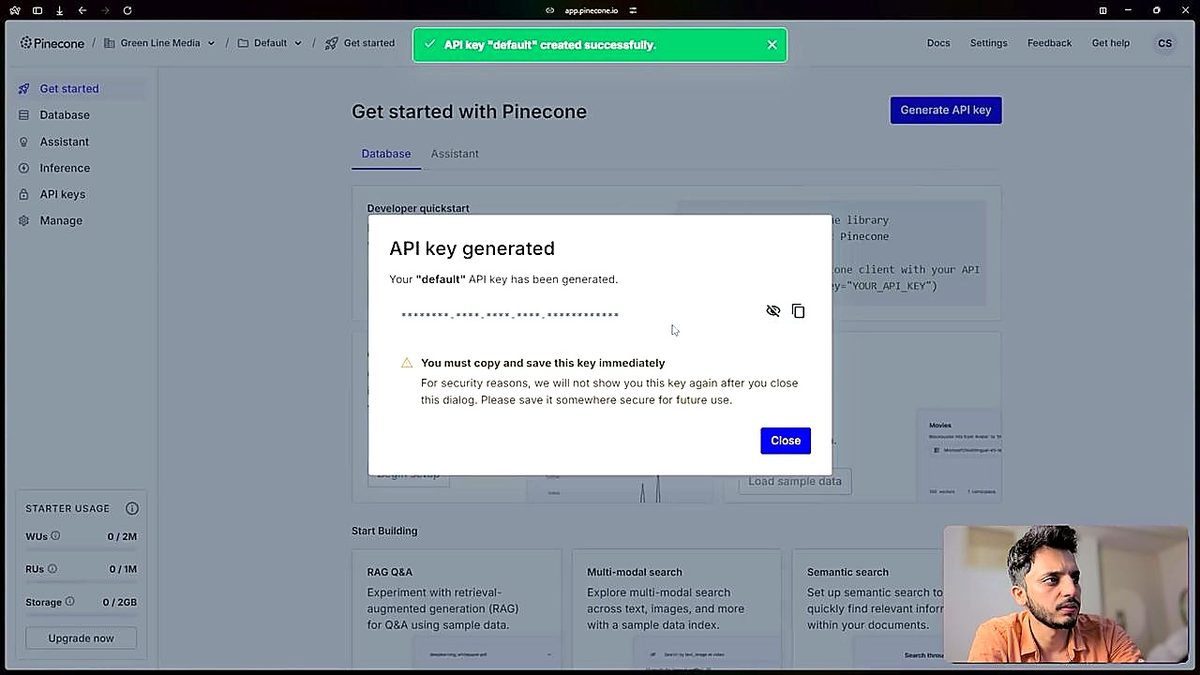
Navigate to API Keys, click Create new API key, name it n8n, and copy the resulting key.
Step 4 Add the Pinecone Vector Store node in n8n
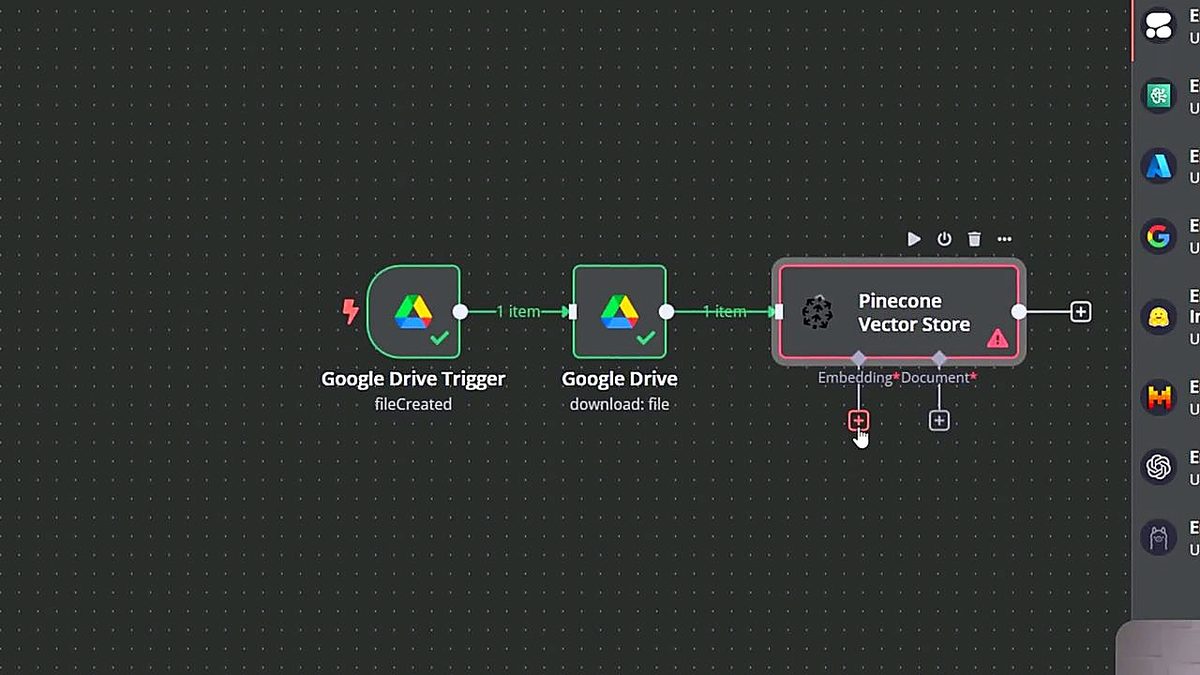
Back in n8n, click the plus button on your workflow, search for Pinecone, and add the Pinecone Vector Store node. Choose Add documents to vector store as the operation.
Step 5 Save the Pinecone credential
Click Create new credential, paste the API key, and save. n8n should report a successful connection.
4.5 Chunking and embedding
Video reference: 29:59 – 31:28 (Chapters 33–35)
The Pinecone node needs three sub-components attached: the embedding model, a document loader, and a text splitter. Let's wire them up.
Step 1 Set operation and select the index
On the Pinecone node, set the operation to Insert documents and select the n8n index you just created.
Step 2 Attach an embeddings model
Open the embeddings slot, choose Embeddings OpenAI, and select text-embedding-3-small — exactly matching the preset you chose when creating the Pinecone index.
Step 3 Add a document loader
Add the Default Document Loader and switch the type to Binary. The trigger downstream is passing PDF binary data, so the loader needs to be in Binary mode to read it.
Step 4 Add a Recursive Character Text Splitter
On the splitter slot, click plus and select the Recursive Character Text Splitter. This is what slices the document into chunks before they get embedded.
Concept: chunk size and overlap
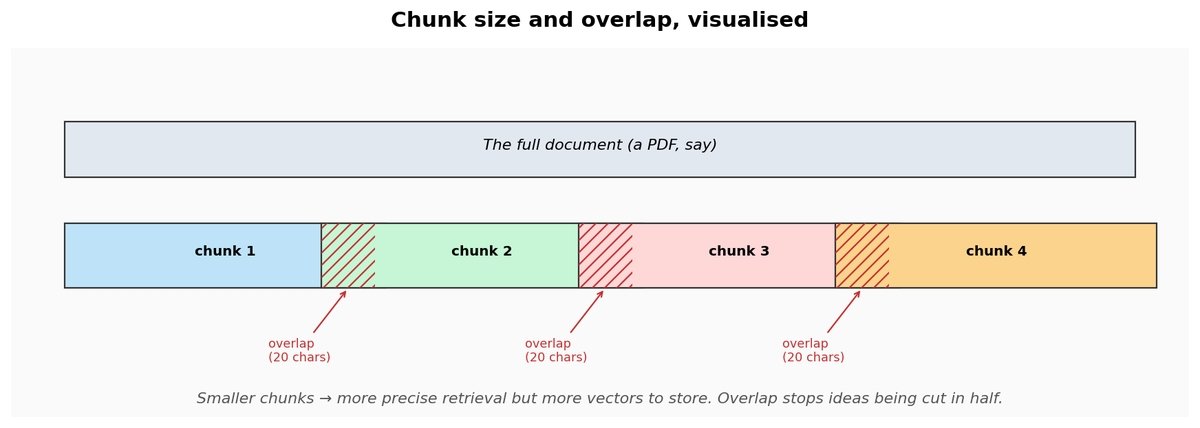
Two key settings on the splitter: chunk size (how many characters in each chunk) and chunk overlap (how many characters the chunks share with their neighbours). They balance precision vs continuity:
Step 5 Pick chunk values
For small documents, set chunk size to 500 and chunk overlap to 20. Tune later based on retrieval quality — very small chunks fragment ideas, very large chunks dilute relevance.

Step 6 Test the ingestion end-to-end
Run the workflow. For a small PDF you should see around ten chunks pushed to Pinecone. Open the Pinecone index UI in your browser to confirm the vectors are there.
Step 7 Activate the workflow
Toggle the workflow to Active in the top bar so future PDF uploads are embedded automatically. Rename the workflow to drive to pinecone for clarity, then return to the overview.
4.6 Adding retrieval to your agent
Video reference: 32:00 – 33:24 (Chapter 36)
Now the fun part. The ingestion workflow runs whenever you drop a PDF in the folder. To actually query those vectors, we add a Vector Store retrieval tool to the agent from module 3.
Step 1 Open the existing agent workflow
Return to your basic agent example workflow (the one with the calendar tools).
Step 2 Add the Vector Store tool
On the AI Agent's Tool slot, search for and add the Vector Store tool. Rename it to retrieve files and write a description such as: a tool used to retrieve documents stored in the user's Google Drive.
Step 3 Bind it to Pinecone
Set the vector store to Pinecone, choose Retrieve documents from the operation list, and select the n8n index. If you set up a Pinecone namespace earlier, set it to n8n; otherwise leave default.
Step 4 Attach a chat model to the tool
The vector store tool itself uses an LLM to synthesise an answer from the retrieved chunks. On the tool's Model slot, add an OpenAI Chat Model and pick GPT-4o mini.
Step 5 Attach matching embeddings
On the embeddings slot, choose Embeddings OpenAI and select text-embedding-3-small — the same model you used during ingestion. This is non-negotiable; different models produce incompatible vectors and retrieval will silently fail.
Step 6 Save and test
Click Save and then Chat to open the chat window.
4.7 Chatting with your files
Video reference: 33:24 – 35:04 (Chapter 37)
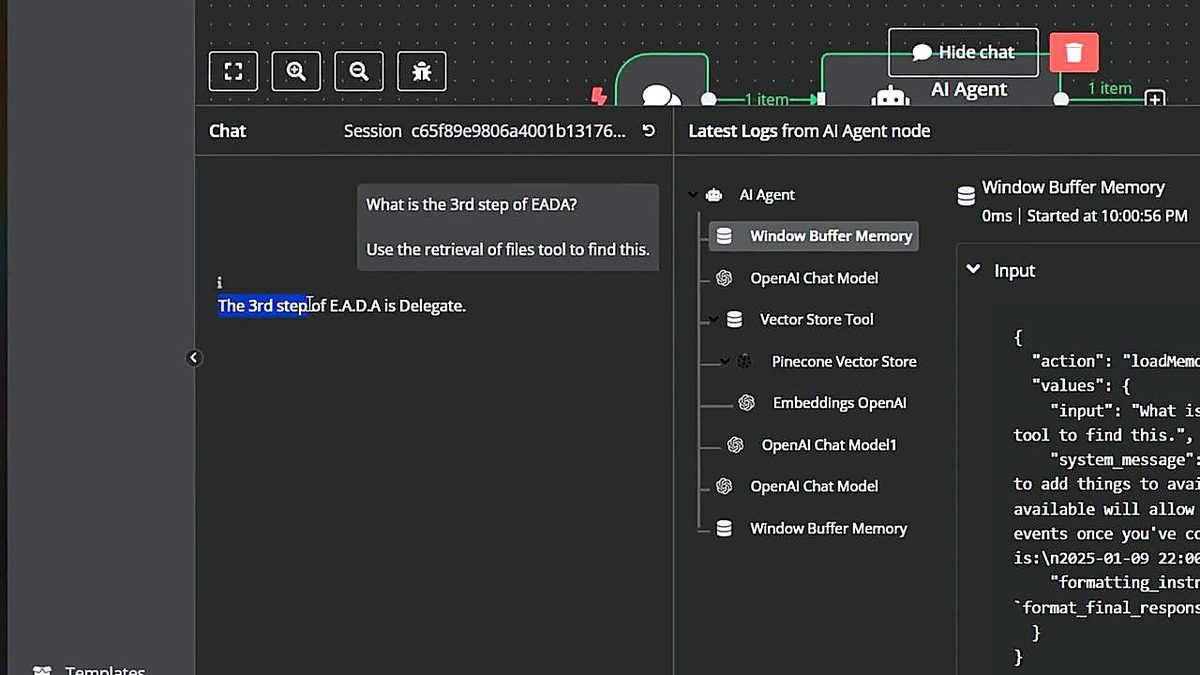
Step 1 Ask a document-grounded question
Ask the agent something only your uploaded PDF would know. In the tutorial example: "what is the third step of EADA — use the retrieval of files tool to find this". The agent should call the Vector Store tool and reply with the correct answer (Delegate, in that example).
Step 2 Ask a follow-up
Ask the agent for examples — "how do I properly delegate, with examples". If the agent answers from general knowledge instead of the document, ask it again to use the retrieval tool.
Step 3 Verify grounded examples
Compare the agent's response to the original PDF. The examples it surfaces should come from your document, not generic advice. If they match, the RAG pipeline is fully working.
What you will learn
- How to build a sub-workflow and expose it to other workflows
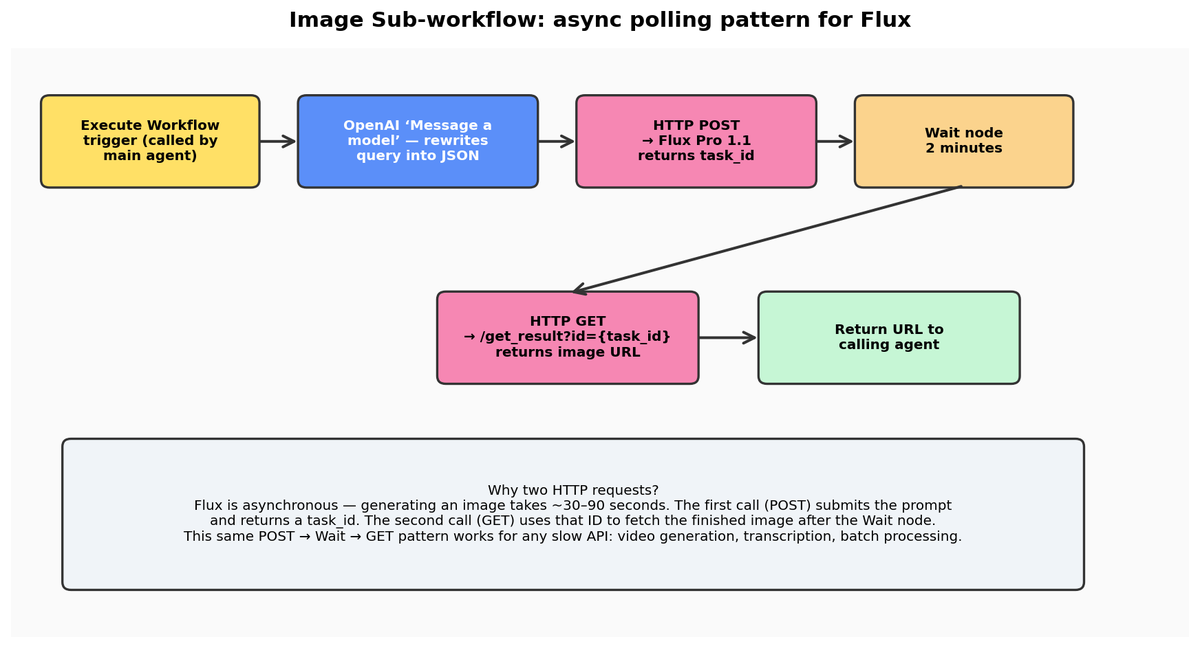
- The async API pattern (POST → Wait → GET) for slow APIs like image generation
- How to call REST APIs from n8n using HTTP Request nodes
- How to use an OpenAI parsing node to reshape free-form input into rigid JSON
- How to use mock data to develop nodes without re-running upstream agents
- How to expose any workflow as a tool to the main agent
Concept: split complexity into sub-workflows
Adding more tools directly to your main agent works, but it gets unwieldy fast. A cleaner approach: build complex capabilities as separate workflows, then expose them to the main agent through n8n's Call workflow tool. Each sub-workflow can be developed and tested in isolation. The image generator we're about to build is the classic case.
5.1 Creating the image generator sub-workflow
Video reference: 36:00 – 36:28 (Chapter 39)
Step 1 Create a new workflow
Create a fresh workflow and name it image generator. This will be the sub-workflow called by your main agent.
Step 2 Add a sub-workflow trigger
Click Add first step and choose the trigger When called by another workflow. This is what lets the main agent invoke this flow as a tool.
Step 3 Sign up for Black Forest Labs (Flux)
In a new tab, sign up for Black Forest Labs (the makers of Flux). Flux is the image model we'll call from this workflow. Add a small balance of credits.
5.2 POST: submit a prompt to Flux
Video reference: 36:28 – 38:12 (Chapters 40–41)
Flux is an asynchronous API: you submit your prompt, get back a task ID immediately, then have to poll a different endpoint for the finished image after some seconds. We'll handle this with two HTTP Request nodes and a Wait node between them.
Step 1 Create a Flux API key
Inside Flux's dashboard, add credits and create a new API key named n8n. Copy it.
Step 2 Add an HTTP Request node
Back in n8n, click the plus on the sub-workflow trigger and add an HTTP Request node.
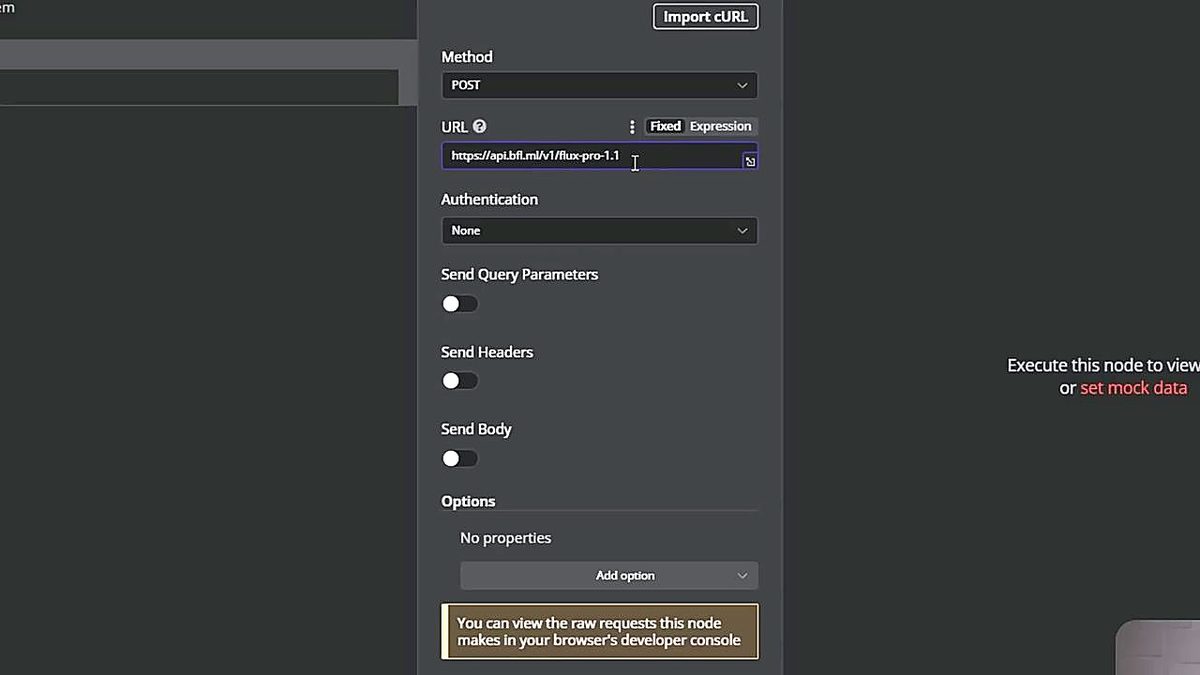
Step 3 Set the method and URL
Change the method to POST and paste the endpoint api.bfl.ml/v1/flux-pro-1.1 — match the version exactly; older or newer Flux versions live at different paths.
Step 4 Add a content-type header
Toggle Send headers on and add a header named content-type with value application/json.
Step 5 Add the auth header
Add another header named x-key with your Flux API key as the value.
Step 6 Build a JSON body
Toggle Send body on, choose JSON → Using fields below, add a field named prompt, and set its value to a test prompt — for example a waterfall in a serene landscape.
Step 7 Test the POST
Click Test step. The response includes a task ID that Flux uses to track the image generation. Save this ID; you'll use it for testing the GET request shortly.
Step 8 Add a Wait node
Back on the canvas, add a Wait node after the POST. Set the wait unit to Minutes and amount to 2. That's a generous buffer — Flux usually finishes in 30–90 seconds, but the buffer stops you polling an unfinished image.
Step 9 Rename the POST node
Rename the HTTP Request POST node to request new image so the canvas reads top-to-bottom as an obvious sequence.
5.3 GET: retrieve the finished image
Video reference: 38:42 – 40:26 (Chapters 43–45)
Step 1 Duplicate the POST node
Right-click the request new image node and duplicate it. Connect the Wait node to the duplicate so it fires after the pause.
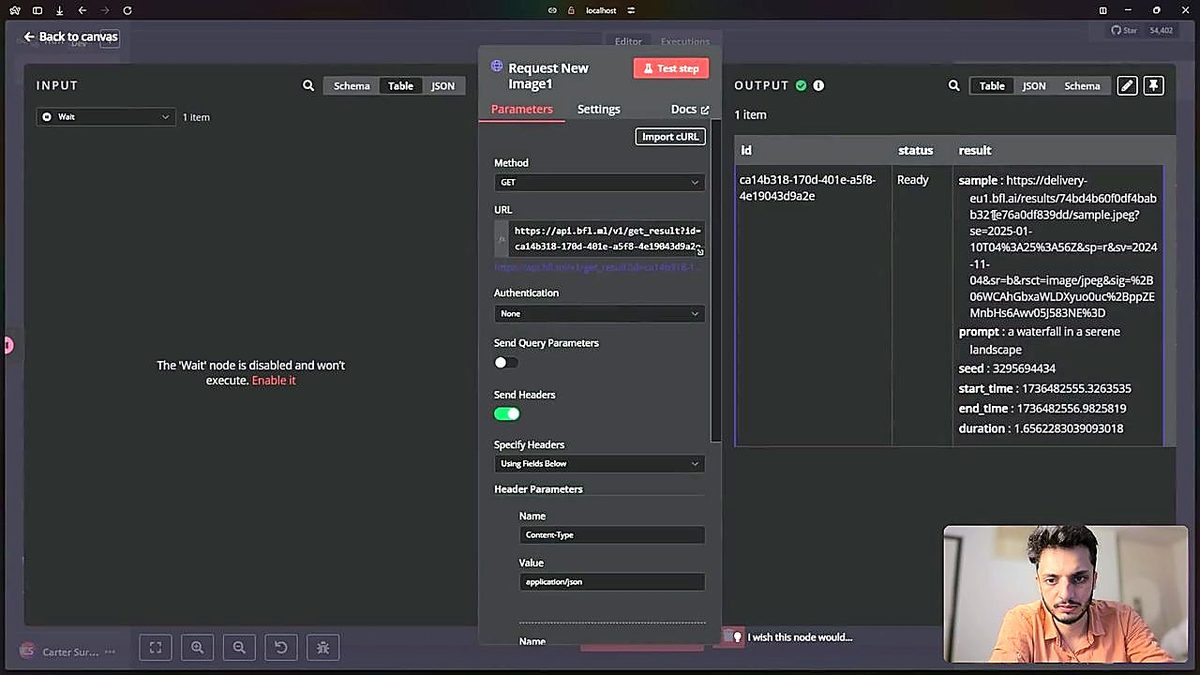
Step 2 Switch the duplicate to GET
Change the method on the duplicate to GET and update the URL path to use get_result instead of the generate endpoint.
Step 3 Disable the body
Toggle Send body off because GET requests should not include a JSON body.
Step 4 Append the task ID as a query parameter
Add ?id= to the URL and paste the task ID from your earlier POST execution for now. We'll make this dynamic shortly.
Step 5 Temporarily disable the Wait node
Click the Wait node and disable it so you can iterate without waiting two real minutes between tests. Just remember to re-enable it later.
Step 6 Test the GET
Run the workflow. The GET node should return an image URL in the response. Copy the URL into a browser tab to view your finished image.
Step 7 Make the task ID dynamic
Rename the GET node to get new image. Then remove the pasted test ID from its URL. Open the upstream request new image output, find the id field, and drag it next to the equals sign — n8n will turn this into an expression that injects whatever ID the latest POST returned. Now the workflow works for any prompt, not just the test one.
Step 8 Reactivate the Wait node
Turn the Wait node back on so production runs include the necessary delay between POST and GET.
5.4 Expose the sub-workflow as an agent tool
Video reference: 40:26 – 41:10 (Chapter 46)
Step 1 Save the image generator
Make sure the image generator workflow is saved, then return to your main agent workflow.
Step 2 Add a Call n8n Workflow tool
On the agent's Tool slot, search for and add Call n8n Workflow. Rename the tool generate image.
Step 3 Write a clear description
Set the description to: call this tool to generate and receive an image. You must give it a prompt. Simply describe the image for the prompt.
Step 4 Link to the sub-workflow
Select Image generator as the target workflow and return to the canvas.
5.5 Capturing test data and structured parsing
Video reference: 41:10 – 45:50 (Chapters 47–48)
Now we hit an interesting problem. The agent will pass its prompt as free-form text, but Flux expects a strict JSON body. We need a translator in the middle. We'll use an OpenAI node configured to output JSON.
Step 1 Test the wiring with a prompt
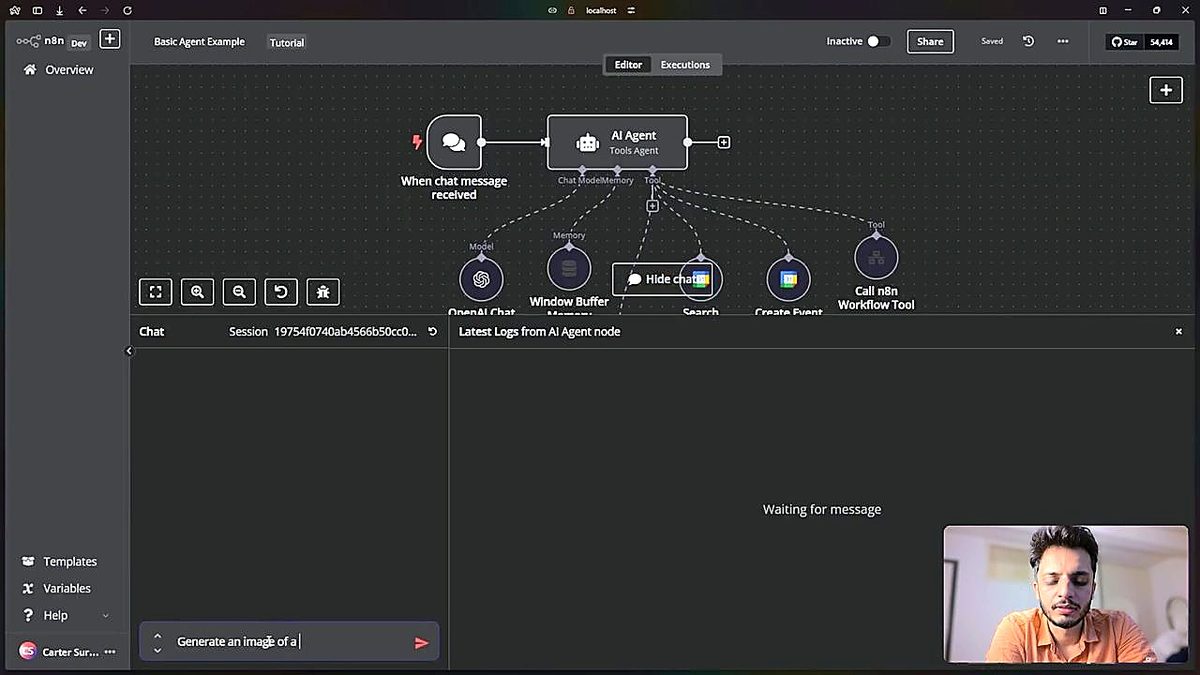
From the main agent's chat panel, send: "generate an image of a bunny in a field". The agent should invoke the generate image tool. Wait for the result, then…
Step 2 Inspect what the agent actually sent
Switch to the image generator workflow, open its latest execution, double-click the Execute workflow trigger, and look at the query parameter. The agent will have enriched the prompt to something like a cute bunny sitting in a lush green field surrounded by colourful wild flowers under a clear blue sky. Copy this payload — we'll use it as mock data for development.
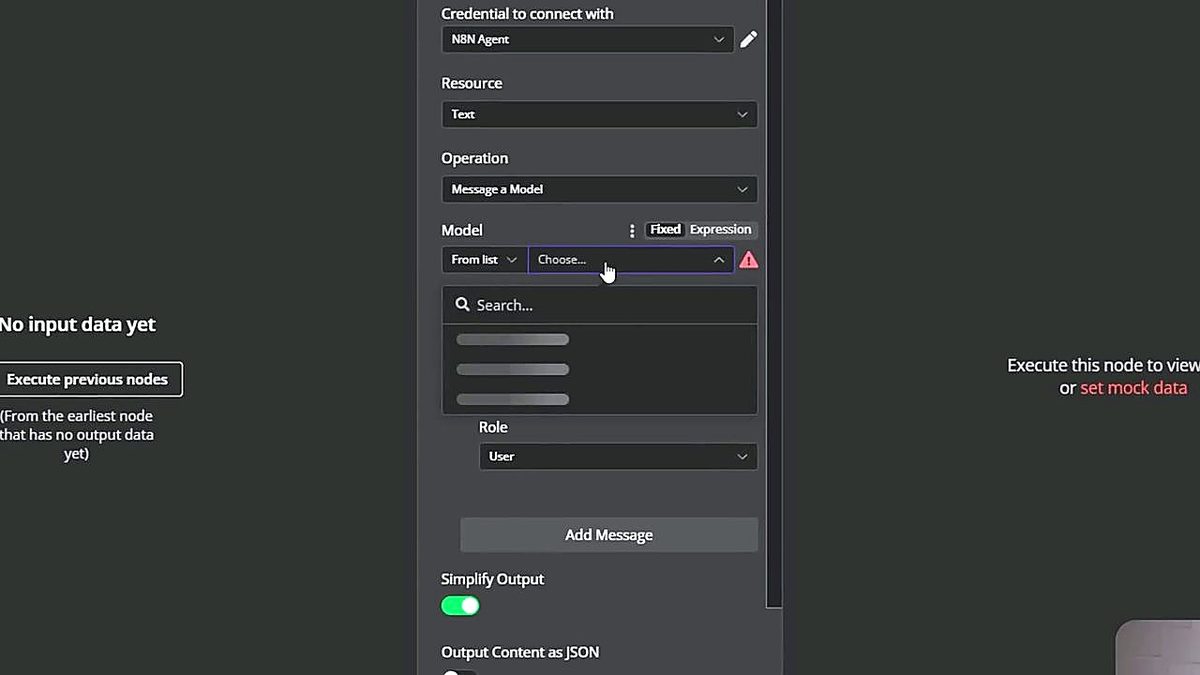
Step 3 Add an OpenAI Message a model node
Between the trigger and the POST request, add the OpenAI → Message a model node. Choose GPT-4o mini.
Step 4 Write a system role instruction
Set role to System with a message such as: You specialize in turning queries into a structured prompt output and outputting your response in JSON.
Step 5 Provide an example input and example output
Show the model the shape it needs to transform. Use the sample query from step 2 as the example input, and paste a JSON object like {"prompt": "…"} as the example output. The key name (prompt) must match what Flux expects in its body.
Step 6 Enable Output content as JSON
Scroll down and toggle Output content as JSON. This tells n8n to parse the model's response as an object rather than a string, so downstream nodes can use the prompt field directly.
Step 7 Test the parser in isolation
Click Test step and verify the model returns a clean JSON object with the prompt field populated.
Step 8 Rewire the POST body
Open the request new image POST node. Change the input source to come from the OpenAI node now. Drag the prompt field from the OpenAI output into the body, replacing the hard-coded prompt.
5.6 Mock data and live binding
Video reference: 45:50 – 47:00 (Chapters 49–50)
Two more fixes before we can declare victory. First, we'll pin a captured query payload as mock data on the trigger, so we can iterate without re-invoking the agent for every test. Then we'll add a dynamic user message so the parser actually transforms the live query.
Step 1 Generate fresh sample data
From the main agent's chat, send another test prompt — for example, "generate an image of a delicious Naples pizza". Open the latest execution in image generator and copy the query parameter from the Execute workflow trigger output.
Step 2 Pin the mock data
Back in the editor, double-click the Execute workflow trigger, paste the query as mock data, and click Save. A pinned indicator confirms the data will be reused on every test run, so you don't need to ping the agent again.
Step 3 Add a user message to the parser
Open the OpenAI parsing node and click Add message. Drag the query field from the upstream trigger so the actual agent input becomes the user message. The parser will now receive real data.
Step 4 Test the step
Run the parser step and confirm the JSON output now contains the pinned query content rewritten as a clean prompt.
Step 5 Unpin the mock data
Double-click the Execute workflow trigger and unpin the test data so live runs use real agent input. Re-check that the reference still resolves on the canvas, then save and return to the main agent workflow.
5.7 Image generation success
Video reference: 47:00 – 47:37 (Chapters 51–52)
Step 1 Ask the agent for an image
From the chat panel on your main agent, send: "generate an image of a flamingo on the moon".
Step 2 Wait for the async result
The agent invokes the generate image tool, which runs the sub-workflow. After the Wait period the sub-workflow returns the finished image URL and the agent reports it back to chat.
Step 3 View the generated image
Open the URL to see your flamingo on the moon. Congratulations — you've completed the end-to-end pipeline.
Troubleshooting Guide
When something doesn't work, resist the urge to start over. Read the execution log first. Below are the issues most students hit while following this guide, with the fastest fix for each.
| Symptom | Fix |
|---|---|
| n8n won't install via npm | Permissions are the usual cause. On macOS/Linux try sudo or configure a non-root npm prefix per the official Node docs. On Windows run PowerShell as Administrator. |
| OpenAI key returns "invalid" | Either the key was copied incorrectly or your account has no billing balance. Confirm there's a balance on the OpenAI dashboard, then regenerate the key and paste it cleanly with no leading/trailing spaces. |
| Google OAuth fails with "redirect URI mismatch" | The redirect URL you whitelisted in Google Cloud doesn't exactly match what n8n is using. Copy n8n's URL from the credential dialog character-for-character into the Authorized redirect URIs list. |
| The agent ignores my tool | The tool description is too vague. Switch the tool's description to manual mode and write one clear sentence telling the agent when to use it (e.g. "this is the tool to use when the user wants to create a calendar event"). |
| Calendar search returns nothing useful | Three things to check: (1) is the date in the system prompt correct? (2) is the time zone set on the Search Availability tool? (3) is the output format set to Raw, not boolean? |
| Pinecone retrieval returns nothing | Embedding-model mismatch is the silent killer. The embedding model used during ingestion must be EXACTLY the same as the one on the Vector Store retrieval tool. text-embedding-3-small on both, or none. |
| My workflow runs in tests but never on its own | It's inactive. Toggle the workflow to Active in the top bar. Only active workflows run from their triggers automatically. |
| Flux POST works but GET returns "task not finished" | Your Wait node is disabled, or its duration is too short. Re-enable it and set it to 2 minutes initially. Tune down once you know typical latency. |
| Image generator always returns the same image | You forgot to unpin the mock data on the Execute workflow trigger. Open the trigger and unpin the test query. |
| Agent gives general-knowledge answers instead of using RAG | Add a sentence to the system prompt forcing tool usage: "For any question about uploaded documents, always use the retrieve files tool first." |
| I see "tracking" or "rate limit" errors | You've hit OpenAI's rate limits. Wait a minute and retry, or upgrade your usage tier in the OpenAI dashboard. |
Where to Go Next
Once you've followed this guide, the best way to lock in what you've learned is to build again from scratch in your own n8n instance. Here's a suggested progression:
1. Rebuild the three agents from memory
Don't peek at this guide. Try to set up the basic agent → calendar → RAG → image generator from scratch. Note where you get stuck — those are the gaps in your understanding that the guide helped you paper over.
2. Swap in your own tools
Instead of Google Calendar, try Notion or Airtable. Instead of Pinecone, try Qdrant or Supabase pgvector. The patterns are identical; the surface area is what changes. Doing this teaches you what's a core agent concept versus a vendor detail.
3. Add proactive triggers
Everything in this guide is chat-triggered. The next leap is a workflow that runs on a schedule (every morning at 8am) or on an external event (a Stripe payment, a Slack mention). These become genuinely autonomous agents.
4. Move from local to hosted
Once you have a workflow you actually rely on, move it from your laptop to a small VPS or n8n cloud. Your workflows will run 24/7 without you keeping your machine on.
Want to know more?
Building agentic AI workflows, RAG pipelines, or n8n automations for your team or product? I am happy to talk it through. Ask me anything.
Ask me a question